Jamie Woods


Uncategorized

Troubleshooting Dante/AES67/etc. For Dummies

Posted by Jamie Woods on

Setting up an Audio Over IP network for the first time and having problems?

Background

Over the summer, we built our first AOIP-enabled radio studio. Based around an AEQ Forum Lite IP, a powerful digital mixer with 16×16 channels of Dante/AES67, we finally completed the project that had been delayed since the pandemic. Going in blind, we found the set-up and troubleshooting guides stopped short of solving our teething issues. It took us a while to find the optimum settings for the new studio. We learnt these lessons so you hopefully don’t have to.

This article assumes you’re briefed on what AOIP is, and know vaguely how it works.

Planning Your Network

You’d be forgiven for thinking that AOIP would work on a conventional gigabit network. However, not all network cards are equal, and neither are network switches.

For most setups, there is no need to run Dante through a switch (and if you do, it needs to be a managed switch as described here – most datacenter-class switches meet that spec – there’s no need to buy an uber-expensive ‘AV’ switch). Instead, just connect the two devices together directly with a decent CAT6 cable. The Dante Controller software lets you set the IP address of the card, so there’s no need to configure a DHCP server.

Most set-up guides will warn you that you shouldn’t mix conventional network traffic with AOIP, and that some ethernet adapters are not compatible. They may, however, stop short of recommending what network adapter to use on your PC for a virtual soundcard.

We first tried a gigabit Intel Pro 1000 PT adapter (a PCI-E card with two gigabit ports), but we weren’t able to get it to perform properly for AOIP.

In the end, we used the motherboard’s built-in Intel I219-LM adapter for AOIP, and a 4-port HP NC364T for general network-y stuff. We found the HP PCI-e card worked reasonably ok for Dante, but the connection was more jittery (with latency jumping from 1ms to 5ms quite often) which didn’t sit right.

Intel I210-based network cards (such as the Intel I210-T1, which is – at the time of writing – is under £40 on eBay) seem ideal for Dante. It’s worth checking what the model your built-in ethernet adapter uses – if it starts with i21, you can use that for AOIP – and a cheaper PCI-E card for general network access.

Clocks + Sync

In a Dante network, one device will become the clock ‘leader’. This means that all other devices in the network will sync to it, which stops separate channels of audio drifting out of sync (remember, in AOIP land, there are no stereo pairs unlike AES/EBU). If you open the Dante Controller software, you can explore clock status and see which device is the current leader.

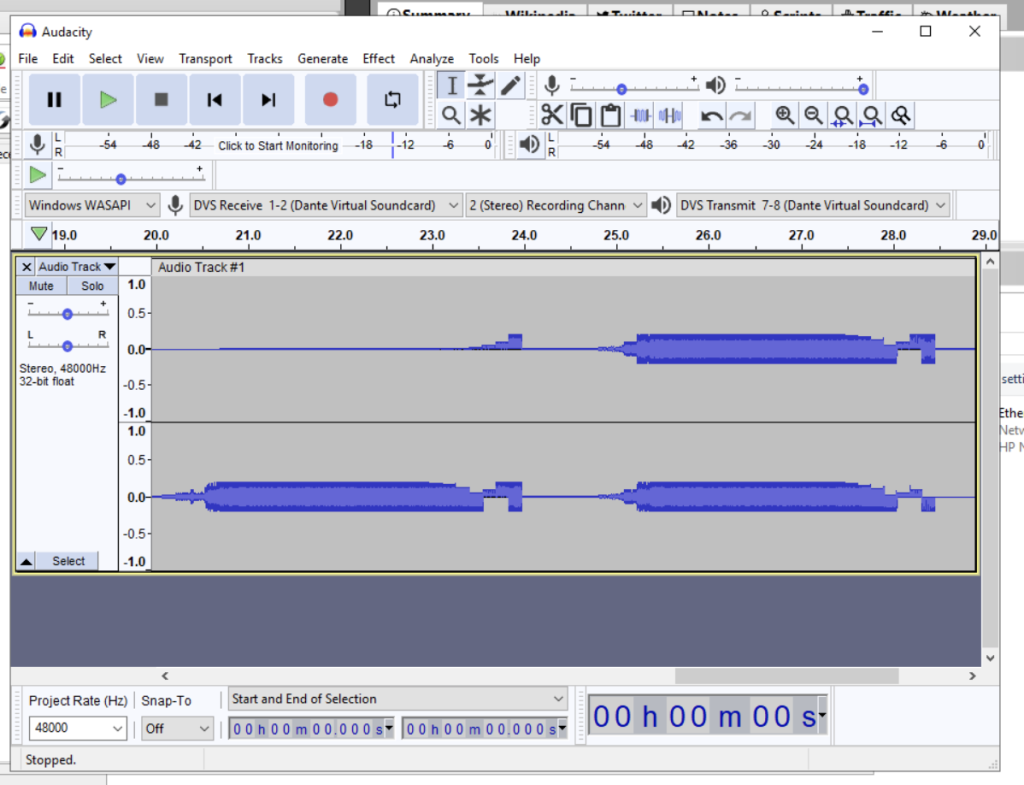
The main symptom of a clock problem is intermittent audio. If you’ve set up your AOIP network, and audio either works just in one direction, or cuts out for a few seconds every so often, it’s probably the clock. In our case, audio was flowing into the desk from Myriad Playout, but we couldn’t record/stream what the desk was returning.

This didn’t look good…

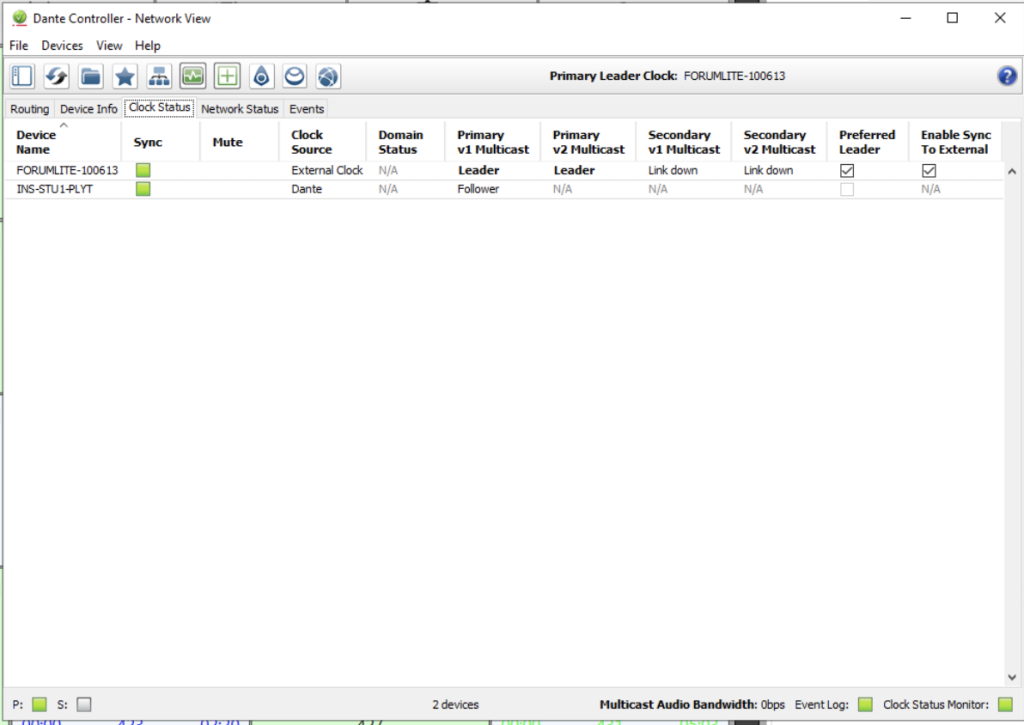
If your clock leader is the mixer core (in small setups, it probably is), then it is very likely that the Dante card needs to use the mixer’s internal clock, rather than the built-in one from the Dante card. This is because the digital signal processing core in most modern mixers will have its own clock.

In Dante Controller, make sure the “Enable Sync to External” option is ticked (rebooting the device as necessary). If this option isn’t ticked, the Dante card will run with a different clock to the mixer, causing weird symptoms, such as that of the first screenshot.

(A big shout-out to my colleagues Mark and Lee at Broadcast Radio for helping me troubleshoot this)

Reducing Latency

Everything was set up and on air, but we had a problem: sometimes (every 20 minutes to 2 hours), latency would spike above 10ms, which results in a brief but noticeable interruption to audio. Not good.

The official troubleshooting guide says to ensure that all power-saving modes are turned off on the network card. Looking in the Device Manager in Windows, indeed, they were.

Or, so we thought.

Without several confusingly-described utilities installed from Intel, it turns out the Energy Efficient Ethernet settings can’t be changed in Windows. After installing the Intel PROSet Adapter Configuration software, we had access to a couple of new settings.

In the end, we found the following settings to be optimum (changes from the default settings are bold; settings you might not see – without all the PROSet utilities – are in italics):

Adaptive Inter-Frame SpacingEnabled
Energy Efficient EthernetDisabled
Flow ControlRX & TX Enabled
Gigabit Leader/Follower ModeAuto-Detect
Interrupt ModerationDisabled
Interrupt Moderation RateOff
Log Link State EventDisabled
Protocol ARP OffloadDisabled
Protocol NS OffloadDisabled
Receive Buffers256
Reduce link speed during system idleDisabled
Speed & Duplex1.0 Gbps Full Duplex
Transmit Buffers2048
Wake On Lan (any related setting)Disabled
No more late packets!

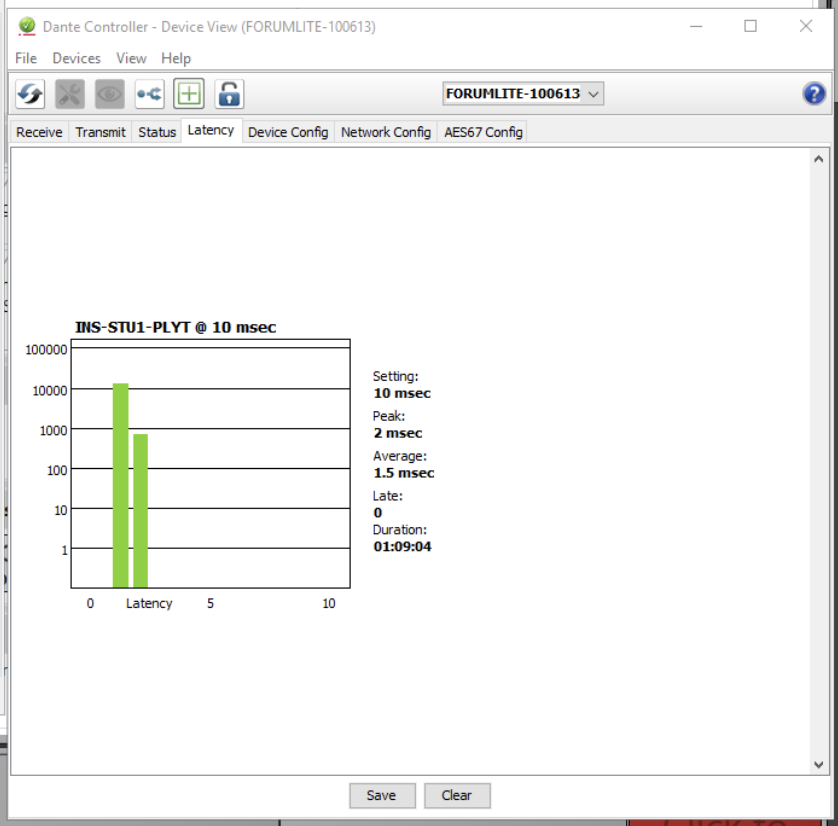
A week later and still no late packets.

Online

Using WordPress Sessions Everywhere In PHP

Posted by Jamie Woods on

Like a huge number of sites, Insanity’s website runs off of WordPress.

Although we use custom WordPress plugins all over the place, there’s plenty of traditional PHP dotted around our website (for example, on our listen pages).

There might be times when you need to get access to session data (e.g. to check if someone’s logged in) from outside of WordPress. Why add another login form when you can reuse the session you already have?

You get the point. Let’s get straight into the code.

<?php
define('SHORTINIT', true);
define('ABSPATH', '/path/to/wordpress/');
define('WP_PLUGIN_URL', '');

require_once ABSPATH . 'wp-load.php';
require_once ABSPATH . WPINC . '/link-template.php';

define('SITEROOT', get_site_url() . '/');

require_once ABSPATH . WPINC . '/class-wp-user.php';
require_once ABSPATH . WPINC . '/class-wp-roles.php';
require_once ABSPATH . WPINC . '/class-wp-role.php';
require_once ABSPATH . WPINC . '/class-wp-session-tokens.php';
require_once ABSPATH . WPINC . '/class-wp-user-meta-session-tokens.php';
require_once ABSPATH . WPINC . '/capabilities.php';
require_once ABSPATH . WPINC . '/user.php';

wp_cookie_constants();

require_once ABSPATH . WPINC . '/vars.php';
require_once ABSPATH . WPINC . '/kses.php';
require_once ABSPATH . WPINC . '/rest-api.php';
require_once ABSPATH . WPINC . '/pluggable.php';
require_once ABSPATH . WPINC . '/general-template.php';

if ( !is_user_logged_in() ) {
        die(header('Location:  ' . wp_login_url(SITEROOT . $_SERVER['REQUEST_URI'])));
}

$wp_user = wp_get_current_user();
// do whatever you want with $wp_user here
?>

Uncategorized

LetsEncrypt and Cloudflare: Generating Wildcard SSL Certificates Securely

Posted by Jamie Woods on

If you’re looking for a simple command to do this, look no further, there’s a tl;dr below!

If you use Cloudflare to run your website, chances are you use them to handle your website’s DNS records too. Which is great. However, say you want to add SSL support to your website without using the one built into Cloudflare (it doesn’t always work best for us).

This is do-able. LetsEncrypt has been around for a while, and recently it began to support wildcard SSL – essentially a way of saying you own the whole of *.insanityradio.com instead of just insanityradio.com and www.insanityradio.com.

Great! To generate a wildcard certificate, you have to prove that you own your domain, and the only completely fair way to do this is by using DNS records, as these are the glue that make up your website. But there’s a caveat, and what most online tutorials will tell you to do opens up a HUGE security vulnerability. Not kidding.

Before we delve deeper into a solution, let’s have a quick recap so we understand exactly what we’re trying to achieve.

How does LetsEncrypt work?

LetsEncrypt will give you a SSL certificate if you can prove that you have enough access to a fully-qualified-domain-name. Often, proving you control the content on the website is enough. But to get a wildcard certificate and prove you own the whole domain, you need to prove you can control the website’s DNS records.

How does it prove you have enough access to the domain? It uses a mechanism called challenge and response. We can nicely sum it up in 5 simple steps.

  1. We ask LetsEncrypt to validate that we own x.insanityradio.com.
  2. LetsEncrypt sends us a challenge text for this domain – think of it like a 2-factor authentication token – it changes every time.
  3. We put this challenge text up on the website, and tell LetsEncrypt to go and check it.
  4. LetsEncrypt tells us that they’ve been able to verify it.
  5. We ask LetsEncrypt to generate a SSL certificate for the domain(s) we’ve just validated.

Traditionally, LetsEncrypt would just prove we control the content on the website. If you remember having to upload those google_xaohdksjahdsakjdhas.html files to prove to Google Analytics that you own the site, it’s similar, but just highly automated.

Let’s go a step further. If we want to prove we own [everything].insanityradio.com, for this to work we’d have to scan every possible domain for this code. Because verifying one doesn’t imply we own all of insanityradio.com (think – if we owned myblog.wordpress.com and tried to verify wordpress.com, that wouldn’t make sense). However, as there’s infinite potential for domains, this obviously isn’t possible – we can’t do those 5 steps infinite times.

The best solution? Prove we own insanityradio.com‘s DNS, and hence physically control all of these sites underneath it.

This works exactly the same as above, but instead of shoving a file on the web server, we have to change its DNS records.

Enter Cloudflare – our DNS provider.

Cloudflare DNS

For this to work best, we need to automate changing these records. Unless you want to, every 60 days, do this whole process by hand. The answer seems immediately obvious, and is well documented everywhere:

Just feed your Cloudflare API key and email into the LetsEncrypt automation script, and let it handle everything.

But hang on – there’s a security hole!

Say someone hacks your web server somehow. Traditionally, this is probably not the end of the world.

But hang on, we’ve saved our Cloudflare API key on the server. When the attacker steals this, it’s game over. They have full control over our Cloudflare account, and the worst bit is Cloudflare won’t email us to tell us someone’s using our key.

Use your imagination to guess what an attacker could do with this access. They could:

  • Redirect your email traffic and intercept it, reset your passwords, and permanently steal your domain.
  • Add malicious code to your website without tampering with the web server
  • Disable your Web Application Firewall
  • Rack up a huge bill by using billable Cloudflare features

Big yikes.

What do now?

Cloudflare doesn’t let you generate a specific key for this, you have to feed the script your entire account’s.

However, there’s a better solution. It’s not perfect, but it completely mitigates the risk of the above.

Say we have a second domain we don’t care much about – insanityradio.co.uk. Nothing runs on it, but we keep it registered because #brand. If you don’t, you can simply register a new one – the name itself doesn’t matter, it could be anything. We’re going to set up this secondary domain so we can use it to verify we own insanityradio.coms DNS.

What?!? Yup. That’s a thing.

Let’s sign up for a new CloudFlare account (avoid using an email on the secondary domain), and set up our secondary domain with it. As we don’t use this domain for much, it’s less of a concern if an attacker gains access to it. They can’t really do much except generate SSL certificates for our main website – if they do, they don’t have the means to use them.

How does this work?

To validate DNS (step 3), we normally create a _acme-challege.insanityradio.com DNS record. This contains the challenge response from step 2.

Instead of creating a record with text, we can create an alias record (a DNS CNAME) that tells LetsEncrypt to look at another domain for this response.

For instance, to verify `insanityradio.com`, we can set up the following:

insanityradio.com CNAME _acme-challenge.insanityradio.com.insanityradio.co.uk

The domain name doesn’t need to be as huge as it is – in fact, we can set the record to any domain. However, if you’re verifying multiple sites in one go, you can’t reuse the target because DNS is slow. It’s best practice to use something unique per domain, and the best way to do that is just to use the domain itself.

The Take Aways

Some valuable lessons have been learnt.

  1. Avoid giving scripts full access to your domain’s DNS.
  2. Cloudflare’s API keys are extremely dangerous

tl;dr (aka the code)

  1. Sign up for a new Cloudflare account with a secondary domain and find its API keys
  2. Add _acme-challenge.insanityradio.com DNS CNAME records pointing to _acme-challenge.insanityradio.com.insanityradio.co.uk (that’s a big boy). If you want to verify a second level domain like *.cor.insanityradio.com, add a DNS record like _acme-challenge.cor.insanityradio.com DNS CNAME records pointing to _acme-challenge.cor.insanityradio.com.insanityradio.co.uk
  3. Install acme.sh$ curl https://get.acme.sh | sh
  4. Run the following to generate a certificate:
    export CF_Key="my cf api key"
    export CF_Email="[email protected]"
    acme.sh --issue \
    	-d insanityradio.com  --challenge-alias insanityradio.com.insanityradio.co.uk \
    	-d *.insanityradio.com --challenge-alias insanityradio.com.insanityradio.co.uk \
    	-d *.cor.insanityradio.com --challenge-alias cor.insanityradio.com.insanityradio.co.uk \
    	--dns dns_cf
    
  5. Add the following cronjob, to ensure your certificates are auto-renewed close to expiry. Make sure to replace `user` with whatever you want.
    0 0 * * * /home/user/.acme.sh/acme.sh --cron --home /home/user/.acme.sh > /dev/null
Falcon

Studio Lighting On The Cheap: A Quick Overview

Posted by Jamie Woods on

As we’ve written about before, visualised radio is one heck of a way to connect with your audience through social media.

But making your studio look good on camera isn’t as easy as re-painting your studio and putting the cameras in good places – your lighting needs to not suck. Here’s some quick lighting advice that will make your radio studio look ten times better without investing in expensive studio lighting.

You can apply this without investing in any specialist lights if your studio has ceiling spotlights, as these can easily be re-angled.

Camera Colours

It’s probably a good idea to configure your studio cameras to have the same colour temperature and gain. The lower the gain, the less noisy the image will be.

Make sure that your colour temperature isn’t too warm or cool.

Light Positioning

The main thing is that you position your lights properly. You want some sort of light behind your presenters to avoid large shadows, and you’ll need a light on the presenters so that you can see them.

The most important thing is the vertical angle of the light, as you shouldn’t have it facing directly down onto a presenter – aim for a diagonal (45º is good). Instead, try angling the lights above one presenting position towards the other.

Our studio has spotlights. Many standard fitting lights allow you to angle the lamp. You can use this to point the lamp in a different direction.

If you can’t re-angle your lights, you can cheat and cut a piece of black plastic into a semi-circle and use this to direct light.

Lighting Colour

Remember that cameras capture images using three channels – red, green and blue. This is very different to what our eyes expect, so some lights will simply not look good on camera.

Fluorescent (and compact fluorescent) lamps only really emit a small range of colours, and tend to show up very green on camera.

Halogen lamps don’t emit much blue light, but by slightly adjusting the colour temperature you can somewhat compensate. You’ll still likely get a very warm image, which might not be what you expect.

White LED lamps produce light at a lot of different frequencies, and have a relatively good balance of colour. As you’d expect, cool LEDs produce more blue light than warm lamps, so depending on the feel of your studio/station choose wisely. Warmer LEDs, however, produce a lot of green light.

LEDs also have a good lifespan and are more environmentally friendly.

Comparison

Before we made these simple changes to our room lighting, our picture quality was very poor. It was hard to watch as the studio looked very pink, even with colour temperature adjustments on halogen bulbs. After swapping to cooler bulbs and re-angling lamps to direct light diagonally, the quality of picture increased dramatically.

Falcon/Online

Insanity At Reading – Visual OB Write-Up

Posted by Jamie Woods on
Insanity At Reading – Visual OB Write-Up

Insanity successfully undertook its first ever visualised radio Outside Broadcast. A joint effort between a hardworking studio and remote team, we managed to achieve something only previously done by the big national stations with flashy budgets. And it didn’t look too bad on air either.

Here’s how we did it.

Studio End – Receiving Content

Before we even started, we had to work out how possible it would be to ingest video from a remote site, and air it both on FM and on our online visual stream.

Luckily, we have a spare computer in our main studio. It’s powerful enough to receive and stream at the same time – great. We normally use this machine to receive outside broadcast content, so it has a mix-minus bus. To output video, we installed the Open Broadcaster Software (OBS) and Dual Monitor Tools.

A DisplayPort to HDMI converter allowed us to connect the OB1 machine to one of the HDMI inputs on the Blackmagic ATEM – which is how we broadcast our normal visual stream.

Dual Monitor Tools allowed us to lock the cursor to the left screen, which avoided any possibility of it appearing on the fake monitor.

OBS was also configured to individually stream to Facebook Live, allowing us to air our show on this platform without using our main studio programme feed (which contains copyrighted music). This allowed us to just broadcast the video inserts and playout with some royalty-free music.

OBS Setup

OBS was configured with 3 different scenes. These were:

  • Slate (and a clone, to allow editing of text)
  • Live
  • Video Tape

Live and Video Tape contain a VLC source. The live source is set to always be active, and is fed by the RTMP feed from remote. The slate is just an image.

The Video Tape scene is configured to play a video file, and will automatically restart/cue when the scene is made live. Frustratingly, it is not possible to get playback time information from OBS/VLC, so we had to rely on in/out cues.

OBS has the Stereo Tool plugin loaded, allowing us to process (as one) the return microphone feeds (there are five microphones). These are then mono summed before being outputted to the studio mixer. To use Stereo Tool as a VST, you need a license. The cheapest one is £30, and we’d definitely recommend the software as it’s fantastic. This is the preset that we used.

We set up Stereo Tool as a filter on the Live and Video Tape. Letting OBS process played-out audio instead of pre-processing it allowed us to speed up turnaround time of clips.

Festival End – Sending Content Back

Interviews were recorded (1080p 35Mbps MPEG2/MXF), rendered into a package, and transmitted to the studio over the internet (encoded as a 4Mbps MP4 file). All pre-recorded content was played out from the studio end, so we’ll touch on that later.

This was surprisingly straightforward. Massive thanks to Smoke Media who were able to loan us a HDMI camera, we’d otherwise have had to hack a smartphone.

A Teradek VidiU (although any RTMP sender could be used – this one happened to be small enough to fit comfortably inside our flight case) accepted a HDMI input from our camera, and output video to the server sitting back at our studio site at about 3Mbps. This was done over the public internet (Festival Republic provided us with a wired ethernet connection which provided us with a shaped 10 up 10 down connection).

Audio

A mixer was set-up with 6 microphone inputs from some SM58s, and the stereo output connected to the camera’s XLR inputs. The mixer’s second bus was used to send incoming talkback over Sennheiser belt packs to the presenter, although we didn’t really end up using this. The Stereo Tool on the studio end processed these microphone feeds to appropriate levels, to ensure it sounds good on air. Care was taken to ensure that the audio input has necessary headroom – the processing has AGC which would fix this in the studio. However, as we learnt, the analogue-to-digital audio converters on cameras are quite noisy, so don’t give yourself too much headroom.

This allowed us to send back audio and video over the same channel, in sync. Due to budgeting reasons, we didn’t have an alternative transmission path, but thankfully as we were not broadcasting all content from site this was not as big an issue as it could have been.

Playing Out Interviews

We ended up using MEGA to send back MP4s from the festival. The audio on these is unprocessed (so you’d average about -30 dB during speech, depending on how far away guests would hold the microphone), but was edited remotely to ensure that any bad language was cut.

Sadly, no radio playout software that we are aware of/is affordable can also play out video content, so we could not rely on automation to air this content. Darn.

OBS allowed us to insert interviews into a scene (which was then streamed as well as input to the studio), and not loop them so that we could manage playout. As a result, the studio operator could cut from the live feed to the playout feed when given the cue by our presenter. OBS doesn’t provide timers for its media players, however, so we had to rely on known out-cues from clips to out segue. However, it seems possible that we could develop an OBS plugin in the future that does exactly this.

Some continuity inserts were pre-recorded in a similar way, as we really wanted to see a live band during the same time as the broadcast.

OBS does not have any media/asset management system, which made it more complicated than should be necessary to load in content for playing out. We could have created multiple scenes to do this, but if anything needed changing we would have had to duplicate these changes by hand in every scene.

The Actual Running

It was a bit hectic. We had several people unfortunately pull out from being able to assist in the studio, but it all got sorted in the end.

Some interviews were recorded 15 minutes before they were due to air (for various admin reasons, we couldn’t air the interviews live), so overall it was in some cases relatively stressful to quickly chop up video, edit audio for language, encode/render, and load this into playout. This was mostly done using ffmpeg on the command line, as we don’t have a license for Adobe Premiere or other video editing software.

For YouTube, audio is loaded into Reaper, processed with Stereo Tool (although we do have an internal web-based tool for this now), and then re-attached to the video. No re-encode necessary.

Phew.

Next year, anyone?

We couldn’t have done this without the help of some fantastic organisations. Special thanks to Festival Republic and LD Communications, for allowing us to do this, to Smoke Media, for letting us pinch a HDMI cam, rhubarbTV, for the video encoder, and to BBC R&D, just for being fantastic.

Falcon

Visual Radio Metapost: Looking Back

Posted by Jamie Woods on

This year, Insanity launched its visual platform – mostly to showcase how radio can be professionally visualised on a shoestring budget.

This post aims to solve some of the less technical problems with launching a visual radio platform, and how we solved them.


When To Stream

Big question: when do you have the cameras on? In fact, it’s not so simple. Don’t forget that with visual radio you have lots of different platforms to stream on.

For us, we almost always stream on our website. As we don’t market this stream extensively, it doesn’t subtract from the impact of the platform.

For special events, we stream on Facebook and YouTube. Facebook draws our biggest audience engagement figures, as you can already target your audience as they’ve probably liked your page.


Licensing Woes

This was the biggest issue for us.

Community radio in the UK, like all other stations, have PRS and PPL licenses to cover music streaming, both on terrestrial, and online. The wording of these license terms is very vague, but our interpretation is that a visualised radio stream, with the original station audio, counts as a simulcast. The only downside is that this limits our distribution on third party platforms – when we do, we need to be very careful not to include music. As long as you have some factor of control (even if that’s just the ability to start or stop your stream) over the platform you’re broadcasting on, you are probably within terms of the license.

Although the services we stream on have music licenses of their own, automated filters are unforgiving and overzealous.

But on-demand, we can completely avoid that issue, as per our social media guidelines, OD content should ideally be one link or idea.

(Remember, we are not your lawyers – please seek legal advice on the terms of your music licensing contract if you’re unsure!)


Getting The Presenters Onboard

Not everyone wants to live stream their show. During the first scheduling term after launch, about ten of our hundred shows decided not to stream themselves on the platform. After a few months, that number dropped to one.

Remember, the radio studio isn’t becoming a TV studio – there’s no pressure on looking amazing on camera.

With the rise of social media, video has become the online first-class content – not audio. Providing just something to go with that audio is exactly what visual radio is about.

Docker

Dockerizing Radio: AudioEngine

Posted by Jamie Woods on

It’s been known for a while that Docker, and containers in general, are slowly creeping into IT infrastructures.

Research shows they are stable enough to use exclusively in production – so why don’t we hop on the bandwagon for radio?

Insanity Tech is developing AudioEngine – a collection of scripts and utilities for virtualising a radio station’s streaming stack. We’ve just released v0.1.0-alpha, as a proof of concept.

To get started, install Ruby, Docker and docker-compose on a server, and clone https://github.com/InsanityRadio/AudioEngine.git.

Create and config.yml (from config.yml.dist). Insert your configuration, and run ruby scripts/build_config to build the docker-compose configuration. Then you can build and launch your streaming system.

Not bad, huh?

The development code is up on GitHub, and developers are, as always, invited to contribute.

Uncategorized

Compiling nchan on Ubuntu 14.04

Posted by Jamie Woods on

If you’re using Ubuntu 14.04, and want to compile a version of the nginx nchan module that works with Redis, this is the guide for you. This is useful if you want to install security updates without recompiling nginx from scratch every time.

  1. Install the nginx PPA for your system: sudo add-apt-repository ppa:nginx/stable && sudo apt-get update
  2. Install nginx from the PPA: sudo apt-get install build-essential nginx-full libnginx-mod-nchan libpcre3-dev libxml2-dev libxslt-dev libgeoip-dev
  3. This’ll install an old version of nchan, but it will install most of the dependencies that we need.
  4. Test the new nginx version to make sure it works. As we’ve just installed a different version, we might have caused some compatibility issues compared to the standard one (i.e. what’s in the normal repositories)
  5. cd /tmp. Download and unpack the nginx we have installed
    wget http://nginx.org/download/nginx-$(nginx -v 2>&1 | cut -d "/" -f 2).zip && unzip nginx*
    wget https://github.com/slact/nchan/archive/v1.1.14.tar.gz && tar -xf v1.1.14.tar.gz
  6. Change directory to nginx. Run configure with the following:
    ./configure --add-dynamic-module=../nchan-1.1.14 --with-cc-opt='-g -O2 -fPIE -fstack-protector --param=ssp-buffer-size=4 -Wformat -Werror=format-security -fPIC -D_FORTIFY_SOURCE=2' --with-ld-opt='-Wl,-Bsymbolic-functions -fPIE -pie -Wl,-z,relro -Wl,-z,now -fPIC' --prefix=/usr/share/nginx --conf-path=/etc/nginx/nginx.conf --http-log-path=/var/log/nginx/access.log --error-log-path=/var/log/nginx/error.log --lock-path=/var/lock/nginx.lock --pid-path=/run/nginx.pid --modules-path=/usr/lib/nginx/modules --http-client-body-temp-path=/var/lib/nginx/body --http-fastcgi-temp-path=/var/lib/nginx/fastcgi --http-proxy-temp-path=/var/lib/nginx/proxy --http-scgi-temp-path=/var/lib/nginx/scgi --http-uwsgi-temp-path=/var/lib/nginx/uwsgi --with-debug --with-pcre-jit --with-http_ssl_module --with-http_stub_status_module --with-http_realip_module --with-http_auth_request_module --with-http_v2_module --with-http_dav_module --with-http_slice_module --with-threads --with-http_addition_module --with-http_geoip_module=dynamic --with-http_gunzip_module --with-http_gzip_static_module --with-http_image_filter_module=dynamic --with-http_sub_module --with-http_xslt_module=dynamic --with-stream=dynamic --with-stream_ssl_module --with-stream_ssl_preread_module --with-mail=dynamic --with-mail_ssl_module
  7. Run make modules
  8. Copy objs/ngx_nchan_module.so to /usr/lib/nginx/modules/ngx_nchan_module_new.so.
  9. Rename /etc/nginx/modules-enabled/50-mod-nchan.conf to 50-mod-nchan-new.conf, edit it, and change ngx_nchan_module.so to ngx_nchan_module_new.so.
  10. Run nginx -t to test that it installed OK.
  11. Restart nginx. Done!
Falcon

Visual Radio Part 2: Automated Vision Mixing

Posted by Jamie Woods on
Visual Radio Part 2: Automated Vision Mixing

So you want to get into visualised radio. Great! That’s what we’re doing, too.

This is a very beefy post. When I have more time, I’ll update it to include more detail and justification.

All the national stations have automatic vision mixing – so all their videos are automatically generated with a lot of complexity (and also with some huge license costs – commercial products are super expensive). How can we achieve this on the cheap, and with high quality?

Insanity worked on this last summer, using a cheap vision mixer and our existing analogue mixing desk (Sonifex S2) with no auxiliaries. Sadly I didn’t take any photos before writing the article, so it is just a big wall of text.

Our shopping list for this project includes:

  • A Blackmagic ATEM switcher (you’ll see why this brand specifically later)
  • Some cameras (we used Marshall CV500MB’s) – make sure they have a (stereo) audio input that works with its SDI output
  • A server with a free USB port
  • A joystick controller port (USB, in this case)
  • Solder, some D-sub 9’s, XLR connectors, 3.5mm jacks, and lots of wire

I’ll assume you’ve set up all the cameras how you want them. We’ve used three – a wide angle, presenter side view, and guest side view.

Here’s our full system diagram:

Firstly, we need to make some cables. For each microphone, a Y-splitter. We use this to split the return signal from the processor into two – one goes back to the desk, one is to go to the cameras.  We’re not actually using the sound from the cameras, we’re just going to measure its levels, so using a Y splitter doesn’t actually impact the quality.

The next cable we need to make (one per “focused” camera) are an odd one – they are female XLR to 3.5mm jack (replace the 3.5mm with whatever inputs your cameras have). Leave the cold core in this cable completely disconnected – don’t pull it to ground like you normally would when balanced to unbalanced. As above, we don’t care about the audio quality going into the camera, and doing so won’t affect the audio return to your mixer. Connect it up neatly, and do a few sanity checks on your mics to make sure you have the wiring correct.

In our cameras, we had to adjust the audio setting so that it used the line input [from the 3.5mm jack]. The audio levels should then became visible in the ATEM mixer, pre-fade. Don’t turn the channels on. This being pre-fade doesn’t matter too much. As the 3.5mm jack is stereo, and (hopefully) our camera supports stereo audio, we can wire two microphones up to each camera to avoid having to use over-the-top mixing circuits or the like.

Note: to actually get audio directly out of the ATEM mix, we provided it a copy of our PGM from the distribution amplifier to make it happy – we don’t want to use the audio we’re getting from the mics as it’s pre-fade and hence always on, and also it sounds somewhat bad.

That’s great, but how do we monitor events like fader starts, and, most importantly, which microphones are live? The solution: a simple joystick controller.

We created some cables to connect the opto-isolated MIC CUE lights for each channel to the joystick port. This is very simple on the S2, as the cue lights behave exactly like virtual switches. The outputs on the S2 can be connected directly to buttons 1-4 on a joystick port. Make sure you get the polarity the correct way around, otherwise it’ll leave you scratching your head as to why it only sometimes works. Once you’ve made one for each channel, connect it to your joystick port, open up a test application (HTML5 Gamepad Tester is excellent for this), and knock a fader slightly to see if you have a connection. On the S2, we had to fit jumpers to the mic channels (Jumper 1) so that the cue light was latching and not momentary.

Boom! The ATEM can now see the camera audio levels, and our server can see what mics are live. Now, we need some software to tie it all together. Enter libatem.

We wrote libatem to address the alarming lack of ATEM APIs – there are a few existing ones but all in low level languages and designed for arduinos and other embedded devices. This is used in a simple Ruby script that combines it with RJoystick, a Ruby library for interfacing with joysticks on Linux. RJoystick only runs on Ruby < 2.2, as it hasn’t been updated in 6 years, so we used 2.0.0 on the server. If using CentOS or RHEL, update your kernel as only the most recent revision contains the correct drivers.

This is the software we use to tie it altogether. It mixes based somewhat on audio levels and die throws. It also responds in real-time to fader opening and closes. Of course, season to taste.

And there you go! Automatic, operator-less vision mixing, using regular video kit, and more kit we had lying around gathering dust.