Category Archives

6 Articles

Falcon

Studio Lighting On The Cheap: A Quick Overview

Posted by Jamie Woods on

As we’ve written about before, visualised radio is one heck of a way to connect with your audience through social media.

But making your studio look good on camera isn’t as easy as re-painting your studio and putting the cameras in good places – your lighting needs to not suck. Here’s some quick lighting advice that will make your radio studio look ten times better without investing in expensive studio lighting.

You can apply this without investing in any specialist lights if your studio has ceiling spotlights, as these can easily be re-angled.

Camera Colours

It’s probably a good idea to configure your studio cameras to have the same colour temperature and gain. The lower the gain, the less noisy the image will be.

Make sure that your colour temperature isn’t too warm or cool.

Light Positioning

The main thing is that you position your lights properly. You want some sort of light behind your presenters to avoid large shadows, and you’ll need a light on the presenters so that you can see them.

The most important thing is the vertical angle of the light, as you shouldn’t have it facing directly down onto a presenter – aim for a diagonal (45º is good). Instead, try angling the lights above one presenting position towards the other.

Our studio has spotlights. Many standard fitting lights allow you to angle the lamp. You can use this to point the lamp in a different direction.

If you can’t re-angle your lights, you can cheat and cut a piece of black plastic into a semi-circle and use this to direct light.

Lighting Colour

Remember that cameras capture images using three channels – red, green and blue. This is very different to what our eyes expect, so some lights will simply not look good on camera.

Fluorescent (and compact fluorescent) lamps only really emit a small range of colours, and tend to show up very green on camera.

Halogen lamps don’t emit much blue light, but by slightly adjusting the colour temperature you can somewhat compensate. You’ll still likely get a very warm image, which might not be what you expect.

White LED lamps produce light at a lot of different frequencies, and have a relatively good balance of colour. As you’d expect, cool LEDs produce more blue light than warm lamps, so depending on the feel of your studio/station choose wisely. Warmer LEDs, however, produce a lot of green light.

LEDs also have a good lifespan and are more environmentally friendly.

Comparison

Before we made these simple changes to our room lighting, our picture quality was very poor. It was hard to watch as the studio looked very pink, even with colour temperature adjustments on halogen bulbs. After swapping to cooler bulbs and re-angling lamps to direct light diagonally, the quality of picture increased dramatically.

Falcon/Online

Insanity At Reading – Visual OB Write-Up

Posted by Jamie Woods on
Insanity At Reading – Visual OB Write-Up

Insanity successfully undertook its first ever visualised radio Outside Broadcast. A joint effort between a hardworking studio and remote team, we managed to achieve something only previously done by the big national stations with flashy budgets. And it didn’t look too bad on air either.

Here’s how we did it.

Studio End – Receiving Content

Before we even started, we had to work out how possible it would be to ingest video from a remote site, and air it both on FM and on our online visual stream.

Luckily, we have a spare computer in our main studio. It’s powerful enough to receive and stream at the same time – great. We normally use this machine to receive outside broadcast content, so it has a mix-minus bus. To output video, we installed the Open Broadcaster Software (OBS) and Dual Monitor Tools.

A DisplayPort to HDMI converter allowed us to connect the OB1 machine to one of the HDMI inputs on the Blackmagic ATEM – which is how we broadcast our normal visual stream.

Dual Monitor Tools allowed us to lock the cursor to the left screen, which avoided any possibility of it appearing on the fake monitor.

OBS was also configured to individually stream to Facebook Live, allowing us to air our show on this platform without using our main studio programme feed (which contains copyrighted music). This allowed us to just broadcast the video inserts and playout with some royalty-free music.

OBS Setup

OBS was configured with 3 different scenes. These were:

  • Slate (and a clone, to allow editing of text)
  • Live
  • Video Tape

Live and Video Tape contain a VLC source. The live source is set to always be active, and is fed by the RTMP feed from remote. The slate is just an image.

The Video Tape scene is configured to play a video file, and will automatically restart/cue when the scene is made live. Frustratingly, it is not possible to get playback time information from OBS/VLC, so we had to rely on in/out cues.

OBS has the Stereo Tool plugin loaded, allowing us to process (as one) the return microphone feeds (there are five microphones). These are then mono summed before being outputted to the studio mixer. To use Stereo Tool as a VST, you need a license. The cheapest one is £30, and we’d definitely recommend the software as it’s fantastic. This is the preset that we used.

We set up Stereo Tool as a filter on the Live and Video Tape. Letting OBS process played-out audio instead of pre-processing it allowed us to speed up turnaround time of clips.

Festival End – Sending Content Back

Interviews were recorded (1080p 35Mbps MPEG2/MXF), rendered into a package, and transmitted to the studio over the internet (encoded as a 4Mbps MP4 file). All pre-recorded content was played out from the studio end, so we’ll touch on that later.

This was surprisingly straightforward. Massive thanks to Smoke Media who were able to loan us a HDMI camera, we’d otherwise have had to hack a smartphone.

A Teradek VidiU (although any RTMP sender could be used – this one happened to be small enough to fit comfortably inside our flight case) accepted a HDMI input from our camera, and output video to the server sitting back at our studio site at about 3Mbps. This was done over the public internet (Festival Republic provided us with a wired ethernet connection which provided us with a shaped 10 up 10 down connection).

Audio

A mixer was set-up with 6 microphone inputs from some SM58s, and the stereo output connected to the camera’s XLR inputs. The mixer’s second bus was used to send incoming talkback over Sennheiser belt packs to the presenter, although we didn’t really end up using this. The Stereo Tool on the studio end processed these microphone feeds to appropriate levels, to ensure it sounds good on air. Care was taken to ensure that the audio input has necessary headroom – the processing has AGC which would fix this in the studio. However, as we learnt, the analogue-to-digital audio converters on cameras are quite noisy, so don’t give yourself too much headroom.

This allowed us to send back audio and video over the same channel, in sync. Due to budgeting reasons, we didn’t have an alternative transmission path, but thankfully as we were not broadcasting all content from site this was not as big an issue as it could have been.

Playing Out Interviews

We ended up using MEGA to send back MP4s from the festival. The audio on these is unprocessed (so you’d average about -30 dB during speech, depending on how far away guests would hold the microphone), but was edited remotely to ensure that any bad language was cut.

Sadly, no radio playout software that we are aware of/is affordable can also play out video content, so we could not rely on automation to air this content. Darn.

OBS allowed us to insert interviews into a scene (which was then streamed as well as input to the studio), and not loop them so that we could manage playout. As a result, the studio operator could cut from the live feed to the playout feed when given the cue by our presenter. OBS doesn’t provide timers for its media players, however, so we had to rely on known out-cues from clips to out segue. However, it seems possible that we could develop an OBS plugin in the future that does exactly this.

Some continuity inserts were pre-recorded in a similar way, as we really wanted to see a live band during the same time as the broadcast.

OBS does not have any media/asset management system, which made it more complicated than should be necessary to load in content for playing out. We could have created multiple scenes to do this, but if anything needed changing we would have had to duplicate these changes by hand in every scene.

The Actual Running

It was a bit hectic. We had several people unfortunately pull out from being able to assist in the studio, but it all got sorted in the end.

Some interviews were recorded 15 minutes before they were due to air (for various admin reasons, we couldn’t air the interviews live), so overall it was in some cases relatively stressful to quickly chop up video, edit audio for language, encode/render, and load this into playout. This was mostly done using ffmpeg on the command line, as we don’t have a license for Adobe Premiere or other video editing software.

For YouTube, audio is loaded into Reaper, processed with Stereo Tool (although we do have an internal web-based tool for this now), and then re-attached to the video. No re-encode necessary.

Phew.

Next year, anyone?

We couldn’t have done this without the help of some fantastic organisations. Special thanks to Festival Republic and LD Communications, for allowing us to do this, to Smoke Media, for letting us pinch a HDMI cam, rhubarbTV, for the video encoder, and to BBC R&D, just for being fantastic.

Falcon

Visual Radio Metapost: Looking Back

Posted by Jamie Woods on

This year, Insanity launched its visual platform – mostly to showcase how radio can be professionally visualised on a shoestring budget.

This post aims to solve some of the less technical problems with launching a visual radio platform, and how we solved them.


When To Stream

Big question: when do you have the cameras on? In fact, it’s not so simple. Don’t forget that with visual radio you have lots of different platforms to stream on.

For us, we almost always stream on our website. As we don’t market this stream extensively, it doesn’t subtract from the impact of the platform.

For special events, we stream on Facebook and YouTube. Facebook draws our biggest audience engagement figures, as you can already target your audience as they’ve probably liked your page.


Licensing Woes

This was the biggest issue for us.

Community radio in the UK, like all other stations, have PRS and PPL licenses to cover music streaming, both on terrestrial, and online. The wording of these license terms is very vague, but our interpretation is that a visualised radio stream, with the original station audio, counts as a simulcast. The only downside is that this limits our distribution on third party platforms – when we do, we need to be very careful not to include music. As long as you have some factor of control (even if that’s just the ability to start or stop your stream) over the platform you’re broadcasting on, you are probably within terms of the license.

Although the services we stream on have music licenses of their own, automated filters are unforgiving and overzealous.

But on-demand, we can completely avoid that issue, as per our social media guidelines, OD content should ideally be one link or idea.

(Remember, we are not your lawyers – please seek legal advice on the terms of your music licensing contract if you’re unsure!)


Getting The Presenters Onboard

Not everyone wants to live stream their show. During the first scheduling term after launch, about ten of our hundred shows decided not to stream themselves on the platform. After a few months, that number dropped to one.

Remember, the radio studio isn’t becoming a TV studio – there’s no pressure on looking amazing on camera.

With the rise of social media, video has become the online first-class content – not audio. Providing just something to go with that audio is exactly what visual radio is about.

Falcon

Visual Radio Part 2: Automated Vision Mixing

Posted by Jamie Woods on
Visual Radio Part 2: Automated Vision Mixing

So you want to get into visualised radio. Great! That’s what we’re doing, too.

This is a very beefy post. When I have more time, I’ll update it to include more detail and justification.

All the national stations have automatic vision mixing – so all their videos are automatically generated with a lot of complexity (and also with some huge license costs – commercial products are super expensive). How can we achieve this on the cheap, and with high quality?

Insanity worked on this last summer, using a cheap vision mixer and our existing analogue mixing desk (Sonifex S2) with no auxiliaries. Sadly I didn’t take any photos before writing the article, so it is just a big wall of text.

Our shopping list for this project includes:

  • A Blackmagic ATEM switcher (you’ll see why this brand specifically later)
  • Some cameras (we used Marshall CV500MB’s) – make sure they have a (stereo) audio input that works with its SDI output
  • A server with a free USB port
  • A joystick controller port (USB, in this case)
  • Solder, some D-sub 9’s, XLR connectors, 3.5mm jacks, and lots of wire

I’ll assume you’ve set up all the cameras how you want them. We’ve used three – a wide angle, presenter side view, and guest side view.

Here’s our full system diagram:

Firstly, we need to make some cables. For each microphone, a Y-splitter. We use this to split the return signal from the processor into two – one goes back to the desk, one is to go to the cameras.  We’re not actually using the sound from the cameras, we’re just going to measure its levels, so using a Y splitter doesn’t actually impact the quality.

The next cable we need to make (one per “focused” camera) are an odd one – they are female XLR to 3.5mm jack (replace the 3.5mm with whatever inputs your cameras have). Leave the cold core in this cable completely disconnected – don’t pull it to ground like you normally would when balanced to unbalanced. As above, we don’t care about the audio quality going into the camera, and doing so won’t affect the audio return to your mixer. Connect it up neatly, and do a few sanity checks on your mics to make sure you have the wiring correct.

In our cameras, we had to adjust the audio setting so that it used the line input [from the 3.5mm jack]. The audio levels should then became visible in the ATEM mixer, pre-fade. Don’t turn the channels on. This being pre-fade doesn’t matter too much. As the 3.5mm jack is stereo, and (hopefully) our camera supports stereo audio, we can wire two microphones up to each camera to avoid having to use over-the-top mixing circuits or the like.

Note: to actually get audio directly out of the ATEM mix, we provided it a copy of our PGM from the distribution amplifier to make it happy – we don’t want to use the audio we’re getting from the mics as it’s pre-fade and hence always on, and also it sounds somewhat bad.

That’s great, but how do we monitor events like fader starts, and, most importantly, which microphones are live? The solution: a simple joystick controller.

We created some cables to connect the opto-isolated MIC CUE lights for each channel to the joystick port. This is very simple on the S2, as the cue lights behave exactly like virtual switches. The outputs on the S2 can be connected directly to buttons 1-4 on a joystick port. Make sure you get the polarity the correct way around, otherwise it’ll leave you scratching your head as to why it only sometimes works. Once you’ve made one for each channel, connect it to your joystick port, open up a test application (HTML5 Gamepad Tester is excellent for this), and knock a fader slightly to see if you have a connection. On the S2, we had to fit jumpers to the mic channels (Jumper 1) so that the cue light was latching and not momentary.

Boom! The ATEM can now see the camera audio levels, and our server can see what mics are live. Now, we need some software to tie it all together. Enter libatem.

We wrote libatem to address the alarming lack of ATEM APIs – there are a few existing ones but all in low level languages and designed for arduinos and other embedded devices. This is used in a simple Ruby script that combines it with RJoystick, a Ruby library for interfacing with joysticks on Linux. RJoystick only runs on Ruby < 2.2, as it hasn’t been updated in 6 years, so we used 2.0.0 on the server. If using CentOS or RHEL, update your kernel as only the most recent revision contains the correct drivers.

This is the software we use to tie it altogether. It mixes based somewhat on audio levels and die throws. It also responds in real-time to fader opening and closes. Of course, season to taste.

And there you go! Automatic, operator-less vision mixing, using regular video kit, and more kit we had lying around gathering dust.

Falcon

Visual Radio Part 1: Distribution

Posted by Jamie Woods on

It’s no secret that Insanity Radio is working on a visualised radio platform. This post will be the first in a series documenting how we did it.

For context, we’re a very small team of (mostly student) broadcast engineers. We’ve never engineered a telly station before, so this is an entirely new field and we’re practically re-inventing it as we go along.

Oddly, we’ll start at what most will consider the last step: distribution.

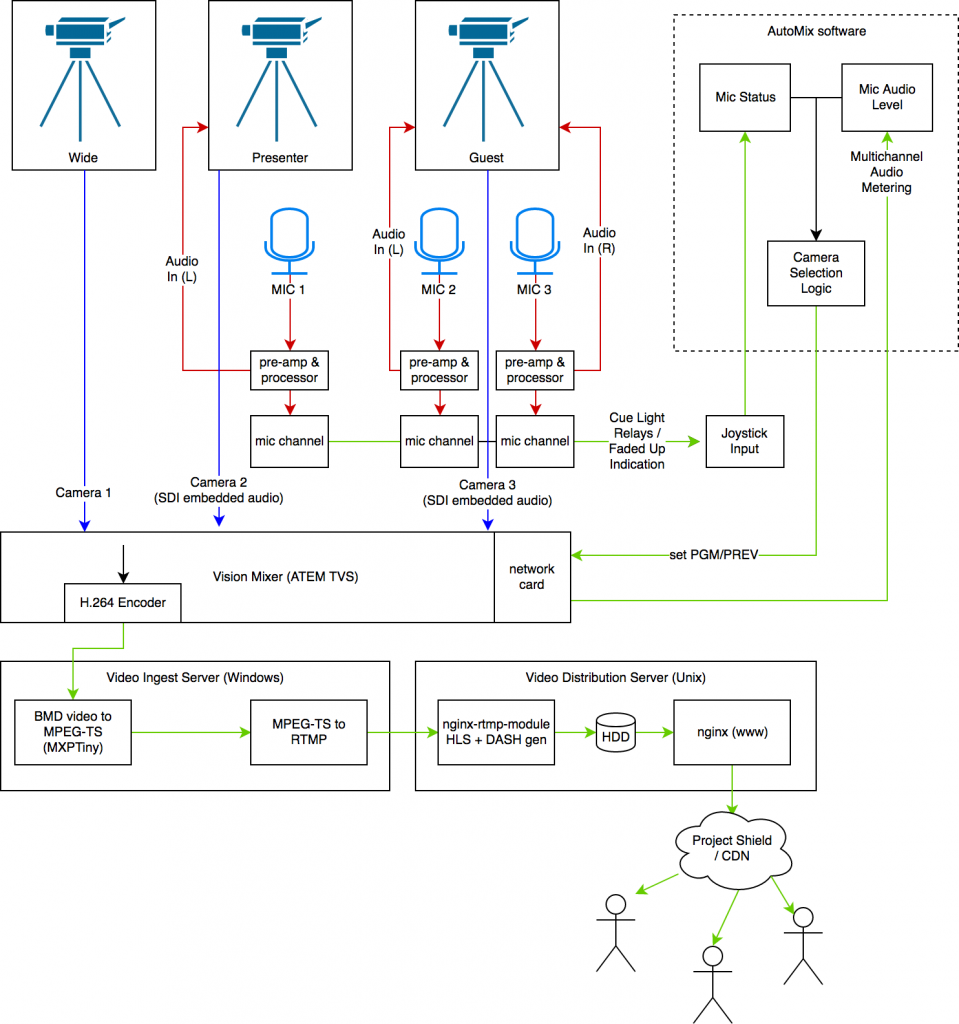
Falcon is built upon a Blackmagic ATEM Television Studio (TVS). The 1080p (HD) version was released a few months after we put in the original purchase orders, which kinda sucked as it limited us to 1080i or 720p. At least we have the built in encoder to work with.

Input to such a device usually would come from a station’s distribution amplifier. In this case, our TVS is our distribution amplifier and runs our main playout facility. Cheap and dirty, but reliable.

When working with online distribution, you can summarise the components in a pretty short list:

  1. Capturing the programme (“PGM”) video and audio.
  2. Transcoding this video to suitable format
  3. Serving this video to users over the Internet
  4. [Logging this captured video]

Capturing PGM

The ATEM Television Studio has a built in USB H.264 encoder. Great. Encoding H.264, even with modern hardware, is computationally expensive. If we could use this, then we wouldn’t have to worry about re-encoding later in the chain (except to downscale – but that’s not important at this point).

Problem: support for this H.264 encoder is shoddy. Live streaming with it is a bit complicated, and the drivers don’t run on Linux (why? Even Blackmagic support don’t know). As Insanity’s backbone is Linux, this left a bad taste in the mouths of the engineers. Moving through it, the first thing we had to do is install Windows Server on a spare rack server, and then the Blackmagic drivers.

Next problem: “Media Express” can’t stream. We looked at several solutions to this that could stream. We purchased an MX Light license, but discovered that it would crash after being left to free run for over 24 hours. Drat. We needed better reliability.

The solution? A piece of open source software called MXPTiny.

MXPTiny doesn’t have many features, so you have to script it yourself. We did this, but were greeted later in the chain with horrible encoding failures – likely due to a bug in ffmpeg streaming RTMP. This wouldn’t do.

After several days of scratching our heads, we came across another piece of software: Nimble Streamer. Although “freeware”, Nimble works off of a cloud configuration platform called WMSPanel. This software is very expensive ($30/month, which is massive for a community station). Fortunately, a Stack Overflow answer said after initial configuration, if you remove the node from WMSPanel it will continue to operate just fine. Great.

So, that left us with these final configurations:

MXPTiny

Prev. Cfg: C:\path\to\ffmpeg.exe -i \\.\pipe\DeckLink.ts -codec copy -f mpegts "udp://127.0.0.1:30001"

Make sure to lower the video bitrate (<5 Mbps is ideal, otherwise most users will stall). Also, having a high bandwidth causes inconsistent chunk sizes in DASH, which can confuse quite a few players.

Nimble Streamer (via WMSPanel)

Set up a UDP server on localhost:30001

Enable RTMP server for the node

Transcoding

We didn’t need to transcode our video. For us, 1080p25, as captured from the H.264 encoder, was ideal. The less overhead, the better. The solution was easy: serve the .TS files from MXPTiny up to Nimble Streamer, which would instead of transcoding just transmux them into RTMP format.

If you’re looking for a better answer, sorry: we don’t have one.

Serving Video

If you haven’t already, read up on HLS and MPEG-DASH. Insanity’s platform exclusively uses them – the RTMP server isn’t public.

These files were generated using nginx-rtmp-module (the sergey-dryabzhinsky fork). This contained a complete enough DASH implementation to be playable with DASH.JS. Why this and not use Nimble Server? The soonest that we could get back into familiar open source territory the better.

The NGINX server was configured to pull video from our Nimble Server, and to serve falcon’s video in both HLS and DASH formats.

server {
	listen 1935;
	chunk_size 4000;
	application falcon {
		deny publish all;
		pull rtmp://10.0.69.69:1935/falcon/video name=video static;
		
		allow play all;
		live on;

		hls on;
		hls_path /srv/dash/falcon/hls;
		hls_fragment 10s;
		hls_playlist_length 1m;
		hls_continuous on;
		hls_cleanup on;

		dash on;
		dash_path /srv/dash/falcon/dash;
		dash_fragment 10s;
		dash_playlist_length 60m;
		
		hls_variant _hi BANDWIDTH=192000;
	}

}

Making It Scale

Video serving is expensive – you can easily saturate a gigabit link with ten odd clients. So, CDNs were created: CDNs are great. Most big media companies use Akamai. Most small companies use Cloudflare.

Akamai is expensive. Cloudflare’s terms prohibit you serving lots of video.

The solution? Google’s Project Shield.

Available exclusively to small, independent media groups, this was ideal for us. The best bit is that Shield doesn’t have a SLA that prevents you from serving multimedia elements.

As DASH and HLS both create long (ish) lived segments that are statically served to clients, they are ideal to scale out. The manifest files only update when a new segment is published – every ten seconds.

The edge nodes were configured to cache the manifest files for 10 seconds, and to cache the DASH segments infinitely. As the presentation delay in DASH is set to 60 seconds, this allows plenty of time for the CDN appropriately expire and update manifests if and when necessary.

Initial tests showed that if several people were playing the stream through Shield, most client requests hit its cache. With the power of Google’s infrastructure behind the project, we can hopefully sleep well at night with this platform being able to handle the worst spikes. Wonderful.

Logging

The DASH server is currently configured to store/serve 1 hour of video. We’ll likely up this in the future, but in the mean time this allows us to reconstruct video. As there is no transcoding of DASH segments, this is trivial.

A piece of software (Grabby, soon to be on the Insanity Radio GitHub) is able to pull DASH segments and reconstruct them without much overhead. This works by concatenating the initialisation segment with the segments we want. This is done twice: once for video, once for audio. ffmpeg then joins our two temporary files together to create our final rip. It’s also able to use ffmpeg to forward video to YouTube and Facebook over RTMP.

When used as part of this design chain, there is absolutely no loss in quality from multiple encoding. We’re still using the original H.264 data from the Blackmagic, so video is never re-encoded after capture. This also allows us to run the software on inexpensive, low-end hardware.

The next post in the series documents how to automate vision mixing


Falcon

How To Make A (Non-Linear) Radio Station

Posted by Jamie Woods on

Radio is pretty linear. By linear, I mean that your content is only really designed to be played out once; then you move on and it is all but forgotten.

So how do you make this compatible with this crazy new internet-age, where this isn’t the case at all?

Technical Background: The BBC, along with EBU, are working on a system called ORPHEUS. Its end goal is to build a studio that almost automatically does this for you. However, this is going to likely take decades to trickle down to smaller broadcasters, so there’s no reason we can’t work on our own solution in the mean time. This post hopefully outlines some of the requirements such a system actually needs. Some of this is somewhat-plagairised from a presentation I saw at a conference, but we’ve elaborated a bit more on the ideas to make them a bit more realistic.

Linear radio looks a bit like this:

  1. Create a show plan and work out what you want to discuss
  2. Perform your show on air, probably not sticking completely to the plan.
  3. Evaluate how you think it went, get feedback from others, etc.
  4. Repeat.

Creating content for, say, YouTube, looks rather similar:

  1. Create a plan for your short, and work out what you want to discuss
  2. Record it, probably multiple times
  3. Edit the raw video down, add titles and graphics, etcetera. Make small improvements, perhaps by refilming a segment.
  4. Publish the video
  5. Look at the analytics and possibly comments.
  6. Repeat

(For a podcast, you can probably follow the same steps as above, but without the video)

So, it’s clear that the thought processes are pretty similar. But how can you take a radio show and put it on social media?

Well, first, you probably want video to go with the audio. The ideal solution here is an easy thought: record some video at the same time as audio in your logs.

The next thing is a bore: rights management. If you use beds, the license for them may not cover social media. If you catch the intro or tail of a song in a link, you can’t use it. So, we need a way to remove content that could be infringing – or we could somehow license it for YouTube. The latter is operationally hard, so we’ll go with the first and engineer it into our system.

Next, you need to actually be able to locate the segment you want to share. But how do you find it in the recordings amidst songs? You then need to be able to work out when to start and when to end the video. Naturally, you could select a whole link here if it’s not crazy long. We need a way to be able to work out when in the video.

So, three things we need to consider to make internet-ready content:

  1. Video to go with your audio output – how do we make this video good?
  2. Editing the original mix to subtract content – where do we even start doing this?!
  3. Locating where our target links are in this video – how do we find the position of our content?

The next series of posts will look into how to solve our three problems. We will look at 2 first, as the solution provides many benefits.