Yearly Archives

7 Articles

Falcon

Visual Radio Part 2: Automated Vision Mixing

Posted by Jamie Woods on
Visual Radio Part 2: Automated Vision Mixing

So you want to get into visualised radio. Great! That’s what we’re doing, too.

This is a very beefy post. When I have more time, I’ll update it to include more detail and justification.

All the national stations have automatic vision mixing – so all their videos are automatically generated with a lot of complexity (and also with some huge license costs – commercial products are super expensive). How can we achieve this on the cheap, and with high quality?

Insanity worked on this last summer, using a cheap vision mixer and our existing analogue mixing desk (Sonifex S2) with no auxiliaries. Sadly I didn’t take any photos before writing the article, so it is just a big wall of text.

Our shopping list for this project includes:

  • A Blackmagic ATEM switcher (you’ll see why this brand specifically later)
  • Some cameras (we used Marshall CV500MB’s) – make sure they have a (stereo) audio input that works with its SDI output
  • A server with a free USB port
  • A joystick controller port (USB, in this case)
  • Solder, some D-sub 9’s, XLR connectors, 3.5mm jacks, and lots of wire

I’ll assume you’ve set up all the cameras how you want them. We’ve used three – a wide angle, presenter side view, and guest side view.

Here’s our full system diagram:

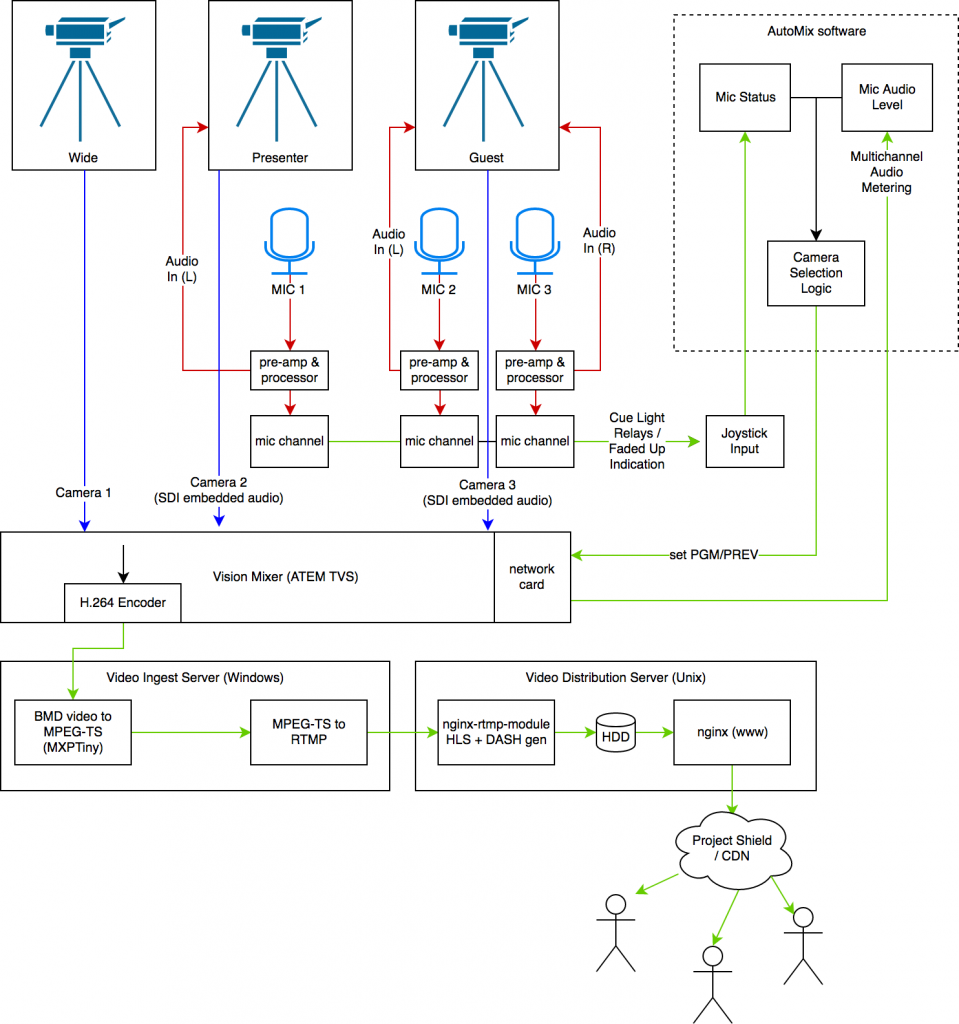
Firstly, we need to make some cables. For each microphone, a Y-splitter. We use this to split the return signal from the processor into two – one goes back to the desk, one is to go to the cameras.  We’re not actually using the sound from the cameras, we’re just going to measure its levels, so using a Y splitter doesn’t actually impact the quality.

The next cable we need to make (one per “focused” camera) are an odd one – they are female XLR to 3.5mm jack (replace the 3.5mm with whatever inputs your cameras have). Leave the cold core in this cable completely disconnected – don’t pull it to ground like you normally would when balanced to unbalanced. As above, we don’t care about the audio quality going into the camera, and doing so won’t affect the audio return to your mixer. Connect it up neatly, and do a few sanity checks on your mics to make sure you have the wiring correct.

In our cameras, we had to adjust the audio setting so that it used the line input [from the 3.5mm jack]. The audio levels should then became visible in the ATEM mixer, pre-fade. Don’t turn the channels on. This being pre-fade doesn’t matter too much. As the 3.5mm jack is stereo, and (hopefully) our camera supports stereo audio, we can wire two microphones up to each camera to avoid having to use over-the-top mixing circuits or the like.

Note: to actually get audio directly out of the ATEM mix, we provided it a copy of our PGM from the distribution amplifier to make it happy – we don’t want to use the audio we’re getting from the mics as it’s pre-fade and hence always on, and also it sounds somewhat bad.

That’s great, but how do we monitor events like fader starts, and, most importantly, which microphones are live? The solution: a simple joystick controller.

We created some cables to connect the opto-isolated MIC CUE lights for each channel to the joystick port. This is very simple on the S2, as the cue lights behave exactly like virtual switches. The outputs on the S2 can be connected directly to buttons 1-4 on a joystick port. Make sure you get the polarity the correct way around, otherwise it’ll leave you scratching your head as to why it only sometimes works. Once you’ve made one for each channel, connect it to your joystick port, open up a test application (HTML5 Gamepad Tester is excellent for this), and knock a fader slightly to see if you have a connection. On the S2, we had to fit jumpers to the mic channels (Jumper 1) so that the cue light was latching and not momentary.

Boom! The ATEM can now see the camera audio levels, and our server can see what mics are live. Now, we need some software to tie it all together. Enter libatem.

We wrote libatem to address the alarming lack of ATEM APIs – there are a few existing ones but all in low level languages and designed for arduinos and other embedded devices. This is used in a simple Ruby script that combines it with RJoystick, a Ruby library for interfacing with joysticks on Linux. RJoystick only runs on Ruby < 2.2, as it hasn’t been updated in 6 years, so we used 2.0.0 on the server. If using CentOS or RHEL, update your kernel as only the most recent revision contains the correct drivers.

This is the software we use to tie it altogether. It mixes based somewhat on audio levels and die throws. It also responds in real-time to fader opening and closes. Of course, season to taste.

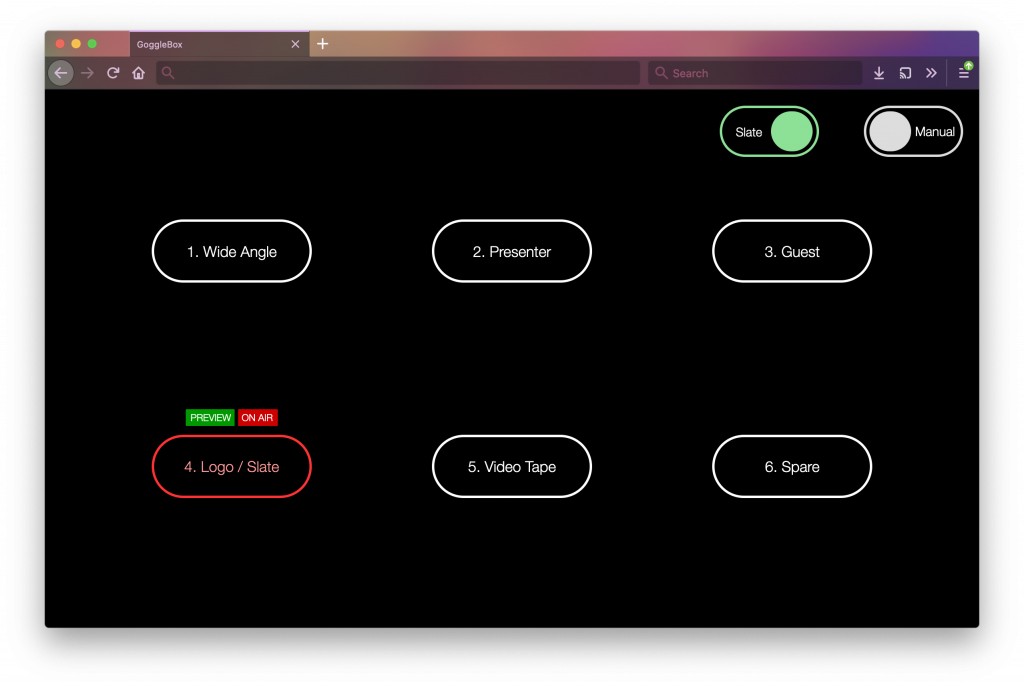
And there you go! Automatic, operator-less vision mixing, using regular video kit, and more kit we had lying around gathering dust.

Uncategorized

How-To: Super Scalable Streaming with HLS

Posted by Jamie Woods on

We’ve just launched AudioEngine, a free Docker-ecosystem based system for completely managing your stream deployment. This includes HLS and DASH, as we outlined in this tutorial. You can read up on it, and get the code, here.

This tutorial will run you through how to build a crazy scalable streaming platform for your radio station, using HLS. This is a long one, so grab a cup of coffee or a Coke.

First, you’ll need to sign up to Google’s Project Shield. This is totally free for independent (e.g. community) radio stations. You can do that here. If you want to use another provider, that’s fine also.

You also require a Linux (or other UNIX-y) server. Although nginx builds fine on Windows, we haven’t tested it.

Although this works on most platforms, there are some exceptions. Notably, in Internet Explorer on Windows 7 and below. For that, you can probably use Flash as a polyfill. We’re not using HE-AAC here, as it’s not supported in all major browsers. If you want to (you’ll break support for Flash/IE, Firefox, and probably Opera – far too many users) add “-profile aac_he_v2”.

Setting Up the Server

On your Linux server, make sure you have GCC installed.

On CentOS/Fedora/etc., run yum -y install gcc gcc-c++ make zlib-devel pcre-devel openssl-devel git autoconf automake cmake pkgconfig.

On a Debian machine, you can run apt-get -y install build-essential zlib1g-dev libpcre3 libpcre3-dev libbz2-dev libssl-dev tar unzip git autoconf automake cmake pkgconfig. If you’re using another flavour of Linux (or UNIX), find the packages above and install ’em.

Next, we need to get and compile nginx with the “nginx-ts-module”. You can also use nginx-rtmp-module, but there’s no point unless you want a full RTMP server.

Move to the tmp directory with cd /tmp

To do this, go to the nginx website and download the latest stable version. For instance, run wget http://nginx.org/download/nginx-1.12.1.tar.gz

Extract it. tar -xf nginx-1.12.1.tar.gz

Next, run git clone https://github.com/arut/nginx-ts-module.git to download nginx-ts-module

Now, cd nginx-1.12.1

Build nginx by running:

./configure \
--user=nginx                          \
--group=nginx                         \
--prefix=/etc/nginx                   \
--sbin-path=/usr/sbin/nginx           \
--conf-path=/etc/nginx/nginx.conf     \
--pid-path=/var/run/nginx.pid         \
--lock-path=/var/run/nginx.lock       \
--error-log-path=/var/log/nginx/error.log \
--http-log-path=/var/log/nginx/access.log \
--with-http_gzip_static_module        \
--with-http_stub_status_module        \
--with-http_ssl_module                \
--with-pcre                           \
--with-file-aio                       \
--with-http_realip_module             \
--without-http_scgi_module            \
--without-http_uwsgi_module           \
--without-http_fastcgi_module         \
--add-module=/tmp/nginx-ts-module

Then, make && make install

Now, to install it on boot, run these commands:

useradd -r nginx

wget -O /etc/init.d/nginx https://gist.github.com/sairam/5892520/raw/b8195a71e944d46271c8a49f2717f70bcd04bf1a/etc-init.d-nginx

The on-boot commands may differ based on your operating system. Google for “build nginx ” and see what it advises there.

Excellent. We’ve built it!

Configuring nginx

In /etc/nginx/nginx.conf, add the following server block:

server {
	listen 80 default;
	root /srv/stream;
	client_max_body_size 0;
	location /stream {
		allow 127.0.0.1;
		deny all;
	
		ts;
		ts_hls path=/srv/stream/hls segment=10s segments=30;
		ts_dash path=/srv/stream/dash segment=10s segments=30;
	}

	location ~ \.(h|mpd|m3u8)$ {
		add_header 'Access-Control-Allow-Origin' '*';
		add_header 'Cache-Control' 'max-age=9';
	}

	location ~ \.(ts|mp4)$ {
		add_header 'Access-Control-Allow-Origin' '*';
		add_header 'Cache-Control' 'max-age=86400';
	}

}

Next, run mkdir /srv/stream /srv/stream/hls /srv/stream/dash /srv/stream/hls/stream /srv/stream/dash/stream to make our web folders for nginx to serve. Then, chown nginx: /srv/stream/dash

Now, we can start nginx with service nginx start and chkconfig nginx on.

Our HLS stream becomes available at http://host-name/hls/stream/index.m3u8, and DASH at http://host-name/dash/stream/index.mpd.

Adding the Plumbing

We have our origin server configured now. Next, we need to pipe some audio into it.

First, install ffmpeg. We need it with “libfdk-aac” so we can get a good quality stream. This will use the most modern HE-AACv2 codec, as it ensures the highest quality at the lowest bitrates. You can follow a guide here for CentOS on how to do so. For Ubuntu/Debian, make sure you have installed autoconf, automake, cmake, and pgkconfig (we did this above). You can then follow the CentOS guide, which should be mostly the same.

In /usr/local/run.sh, add the following (replacing the stream.cor bit with your regular stream URL):

#!/bin/bash
while [ true ]; do
    ffmpeg -i https://stream.cor.insanityradio.com/path_to_icecast_mp3 -c:a libfdk_aac -b:a 128k -f mpegts http://127.0.0.1/stream
    sleep 0.1
done

These commands tell ffmpeg to grab a copy of your Icecast stream, encode it with High Efficiency AAC, and send it to the server so that it can repackage it for browsers. If it crashes, it will automatically restart after 1/10th of a second (this is intentional, as if the system is ill-configured, the batch job would choke available system resources).

If you want to get even better quality, you can use an RTP stream or something else in the ffmpeg command. The reason I’m not using this in the example above is that, to achieve that, it requires an overhaul of your streaming architecture to use PCM on ingest. If you have a Barix based STL, you can configure it to RTP send to your streaming server, thus saving the need for an extra audio interface.

Append to /etc/rc.local the following line to instruct the system to automatically restart our script on boot:

/usr/local/run.sh&

(You could do this using systemd or initv for production, but this works well enough)

Excellent. When you run /usr/local/run.sh& or reboot, you should be able to access your streams.

Setting up the CDN

CDNs are designed to copy your content so that it can scale. For instance, instead of having one server (our origin) serving 100,000 clients, we can send this to lots of “edge” servers. Providers make this easy and are more cost efficient.

We’re using Project Shield, because it’s totally free for indie media, and harnesses the same power of Google. Other freebies exist like CloudFlare, but CloudFlare’s terms of service don’t let you use it for multimedia.

The nginx config we used above should allow your CDN to work properly from the onset. It will cache the manifest/index files (that instruct the client which audio segments to get) for 10 seconds. After 10 seconds, the files will have changed so we want the edges to update. The media files will be cached for a day so once the CDN grabs it once, it will never need to again.

Usage & Testing

I’ll post some sample player code on GitHub, but you probably want to use the HLS stream with hls.js. You can test it on this page. Why not DASH? nginx-ts-module, at the time of writing, has tiny gaps between audio segments. These are pretty audible to an average listeners, so until that is fixed we might as well continue using HLS.

Once again, the streaming URLs will be http://yourcdnhost.com/hls/stream/index.m3u8 (HLS), and http://yourcdnhost.com/dash/stream/index.mpd (DASH).

Do consider setting up SSL. It requires a couple of tweaks in your nginx configuration, and LetsEncrypt makes it much easier. Google are working on support for LetsEncrypt in Shield – hopefully when you read this it will be much easier to use, instead of having to manually replace SSL/TLS certificates every 60 days.

Going Further

The nginx-rtmp-module, similar to install, provides adaptive bitrate HLS (but not DASH). However, there is a bug in Mobile Safari that adds silent gaps between the segments. The TS module will soon support now supports adaptive HLS, this guide will be updated when that happens. You can also hack it yourself.

Falcon

Visual Radio Part 1: Distribution

Posted by Jamie Woods on

It’s no secret that Insanity Radio is working on a visualised radio platform. This post will be the first in a series documenting how we did it.

For context, we’re a very small team of (mostly student) broadcast engineers. We’ve never engineered a telly station before, so this is an entirely new field and we’re practically re-inventing it as we go along.

Oddly, we’ll start at what most will consider the last step: distribution.

Falcon is built upon a Blackmagic ATEM Television Studio (TVS). The 1080p (HD) version was released a few months after we put in the original purchase orders, which kinda sucked as it limited us to 1080i or 720p. At least we have the built in encoder to work with.

Input to such a device usually would come from a station’s distribution amplifier. In this case, our TVS is our distribution amplifier and runs our main playout facility. Cheap and dirty, but reliable.

When working with online distribution, you can summarise the components in a pretty short list:

  1. Capturing the programme (“PGM”) video and audio.
  2. Transcoding this video to suitable format
  3. Serving this video to users over the Internet
  4. [Logging this captured video]

Capturing PGM

The ATEM Television Studio has a built in USB H.264 encoder. Great. Encoding H.264, even with modern hardware, is computationally expensive. If we could use this, then we wouldn’t have to worry about re-encoding later in the chain (except to downscale – but that’s not important at this point).

Problem: support for this H.264 encoder is shoddy. Live streaming with it is a bit complicated, and the drivers don’t run on Linux (why? Even Blackmagic support don’t know). As Insanity’s backbone is Linux, this left a bad taste in the mouths of the engineers. Moving through it, the first thing we had to do is install Windows Server on a spare rack server, and then the Blackmagic drivers.

Next problem: “Media Express” can’t stream. We looked at several solutions to this that could stream. We purchased an MX Light license, but discovered that it would crash after being left to free run for over 24 hours. Drat. We needed better reliability.

The solution? A piece of open source software called MXPTiny.

MXPTiny doesn’t have many features, so you have to script it yourself. We did this, but were greeted later in the chain with horrible encoding failures – likely due to a bug in ffmpeg streaming RTMP. This wouldn’t do.

After several days of scratching our heads, we came across another piece of software: Nimble Streamer. Although “freeware”, Nimble works off of a cloud configuration platform called WMSPanel. This software is very expensive ($30/month, which is massive for a community station). Fortunately, a Stack Overflow answer said after initial configuration, if you remove the node from WMSPanel it will continue to operate just fine. Great.

So, that left us with these final configurations:

MXPTiny

Prev. Cfg: C:\path\to\ffmpeg.exe -i \\.\pipe\DeckLink.ts -codec copy -f mpegts "udp://127.0.0.1:30001"

Make sure to lower the video bitrate (<5 Mbps is ideal, otherwise most users will stall). Also, having a high bandwidth causes inconsistent chunk sizes in DASH, which can confuse quite a few players.

Nimble Streamer (via WMSPanel)

Set up a UDP server on localhost:30001

Enable RTMP server for the node

Transcoding

We didn’t need to transcode our video. For us, 1080p25, as captured from the H.264 encoder, was ideal. The less overhead, the better. The solution was easy: serve the .TS files from MXPTiny up to Nimble Streamer, which would instead of transcoding just transmux them into RTMP format.

If you’re looking for a better answer, sorry: we don’t have one.

Serving Video

If you haven’t already, read up on HLS and MPEG-DASH. Insanity’s platform exclusively uses them – the RTMP server isn’t public.

These files were generated using nginx-rtmp-module (the sergey-dryabzhinsky fork). This contained a complete enough DASH implementation to be playable with DASH.JS. Why this and not use Nimble Server? The soonest that we could get back into familiar open source territory the better.

The NGINX server was configured to pull video from our Nimble Server, and to serve falcon’s video in both HLS and DASH formats.

server {
	listen 1935;
	chunk_size 4000;
	application falcon {
		deny publish all;
		pull rtmp://10.0.69.69:1935/falcon/video name=video static;
		
		allow play all;
		live on;

		hls on;
		hls_path /srv/dash/falcon/hls;
		hls_fragment 10s;
		hls_playlist_length 1m;
		hls_continuous on;
		hls_cleanup on;

		dash on;
		dash_path /srv/dash/falcon/dash;
		dash_fragment 10s;
		dash_playlist_length 60m;
		
		hls_variant _hi BANDWIDTH=192000;
	}

}

Making It Scale

Video serving is expensive – you can easily saturate a gigabit link with ten odd clients. So, CDNs were created: CDNs are great. Most big media companies use Akamai. Most small companies use Cloudflare.

Akamai is expensive. Cloudflare’s terms prohibit you serving lots of video.

The solution? Google’s Project Shield.

Available exclusively to small, independent media groups, this was ideal for us. The best bit is that Shield doesn’t have a SLA that prevents you from serving multimedia elements.

As DASH and HLS both create long (ish) lived segments that are statically served to clients, they are ideal to scale out. The manifest files only update when a new segment is published – every ten seconds.

The edge nodes were configured to cache the manifest files for 10 seconds, and to cache the DASH segments infinitely. As the presentation delay in DASH is set to 60 seconds, this allows plenty of time for the CDN appropriately expire and update manifests if and when necessary.

Initial tests showed that if several people were playing the stream through Shield, most client requests hit its cache. With the power of Google’s infrastructure behind the project, we can hopefully sleep well at night with this platform being able to handle the worst spikes. Wonderful.

Logging

The DASH server is currently configured to store/serve 1 hour of video. We’ll likely up this in the future, but in the mean time this allows us to reconstruct video. As there is no transcoding of DASH segments, this is trivial.

A piece of software (Grabby, soon to be on the Insanity Radio GitHub) is able to pull DASH segments and reconstruct them without much overhead. This works by concatenating the initialisation segment with the segments we want. This is done twice: once for video, once for audio. ffmpeg then joins our two temporary files together to create our final rip. It’s also able to use ffmpeg to forward video to YouTube and Facebook over RTMP.

When used as part of this design chain, there is absolutely no loss in quality from multiple encoding. We’re still using the original H.264 data from the Blackmagic, so video is never re-encoded after capture. This also allows us to run the software on inexpensive, low-end hardware.

The next post in the series documents how to automate vision mixing


Uncategorized

Email: Vulnerable To Blacklist

Posted by Jamie Woods on

This morning I received an email informing me that the Insanity Radio mail server had been added to two email blacklists.

*Groan* go most system administrators. This usually means one of our users’ has had their email account compromised, probably by using a weak password. Most of the time, this is probably right. However, the reasons behind this were more alarming than you’d consider, and actually point to a vulnerability within most Postfix/SpamAssassin set-ups.

A bit of background: Postfix is a mail server. SpamAssassin is a server which is fed emails and responds with a score on how spammy the email is. Combine the two and you have a pretty good way to filter out spam. However, this is where it gets a bit more tricky.

Postfix has a concept of filters – a way of running email through a bit of code. There are two main types, before-queue and after-queue. before-queue will apply the filter before the email is accepted by the server, and after-queue will apply after the email is accepted.

The problem is that most SpamAssassin set-ups work after-queue. This means that your incoming mail server will accept spam emails before it scans them. If it rejects an email later on, it will send a response to the sender saying it bounced, and why.

You’ve probably seen emails from “MAILER DAEMON” saying stuff like “The email you tried to send your thing to doesn’t exist”. It’s pretty much the same.

Now, there’s actually a surprisingly easy way to exploit this. This could be used by an attacker to quite comfortably destroy the reputation of a mail server. Scary, huh? The attack can be done in a few simple steps.

  1. Connect to your target mail server.
  2. Send the most horrible spammy email you can, one that checks all the boxes on SpamAssassin
  3. Set the envelope address to a honeypot address
  4. Rinse & Repeat

The mail server will send a bounce email to the honeypot address, and will get added to an email blacklist as a result.

The best solution is just to install amavisd, and just let that handle interconnecting to SpamAssassin.

Falcon

How To Make A (Non-Linear) Radio Station

Posted by Jamie Woods on

Radio is pretty linear. By linear, I mean that your content is only really designed to be played out once; then you move on and it is all but forgotten.

So how do you make this compatible with this crazy new internet-age, where this isn’t the case at all?

Technical Background: The BBC, along with EBU, are working on a system called ORPHEUS. Its end goal is to build a studio that almost automatically does this for you. However, this is going to likely take decades to trickle down to smaller broadcasters, so there’s no reason we can’t work on our own solution in the mean time. This post hopefully outlines some of the requirements such a system actually needs. Some of this is somewhat-plagairised from a presentation I saw at a conference, but we’ve elaborated a bit more on the ideas to make them a bit more realistic.

Linear radio looks a bit like this:

  1. Create a show plan and work out what you want to discuss
  2. Perform your show on air, probably not sticking completely to the plan.
  3. Evaluate how you think it went, get feedback from others, etc.
  4. Repeat.

Creating content for, say, YouTube, looks rather similar:

  1. Create a plan for your short, and work out what you want to discuss
  2. Record it, probably multiple times
  3. Edit the raw video down, add titles and graphics, etcetera. Make small improvements, perhaps by refilming a segment.
  4. Publish the video
  5. Look at the analytics and possibly comments.
  6. Repeat

(For a podcast, you can probably follow the same steps as above, but without the video)

So, it’s clear that the thought processes are pretty similar. But how can you take a radio show and put it on social media?

Well, first, you probably want video to go with the audio. The ideal solution here is an easy thought: record some video at the same time as audio in your logs.

The next thing is a bore: rights management. If you use beds, the license for them may not cover social media. If you catch the intro or tail of a song in a link, you can’t use it. So, we need a way to remove content that could be infringing – or we could somehow license it for YouTube. The latter is operationally hard, so we’ll go with the first and engineer it into our system.

Next, you need to actually be able to locate the segment you want to share. But how do you find it in the recordings amidst songs? You then need to be able to work out when to start and when to end the video. Naturally, you could select a whole link here if it’s not crazy long. We need a way to be able to work out when in the video.

So, three things we need to consider to make internet-ready content:

  1. Video to go with your audio output – how do we make this video good?
  2. Editing the original mix to subtract content – where do we even start doing this?!
  3. Locating where our target links are in this video – how do we find the position of our content?

The next series of posts will look into how to solve our three problems. We will look at 2 first, as the solution provides many benefits.

Uncategorized

Welcome

Posted by Jamie Woods on

This blog details the technical changes that occur under-the-hood at Insanity Radio 103.2FM, a community radio station who live in Surrey.

Why? Our technical operations are very fast paced, and we do a lot of things that aren’t industry standard. But we want them to be.

Feel free to pinch any of the ideas on this site for your own use, commercial or otherwise. Also to criticise, etc. We’d honestly love to hear feedback.