Category Archives

6 Articles

Uncategorized

Troubleshooting Dante/AES67/etc. For Dummies

Posted by Jamie Woods on

Setting up an Audio Over IP network for the first time and having problems?

Background

Over the summer, we built our first AOIP-enabled radio studio. Based around an AEQ Forum Lite IP, a powerful digital mixer with 16×16 channels of Dante/AES67, we finally completed the project that had been delayed since the pandemic. Going in blind, we found the set-up and troubleshooting guides stopped short of solving our teething issues. It took us a while to find the optimum settings for the new studio. We learnt these lessons so you hopefully don’t have to.

This article assumes you’re briefed on what AOIP is, and know vaguely how it works.

Planning Your Network

You’d be forgiven for thinking that AOIP would work on a conventional gigabit network. However, not all network cards are equal, and neither are network switches.

For most setups, there is no need to run Dante through a switch (and if you do, it needs to be a managed switch as described here – most datacenter-class switches meet that spec – there’s no need to buy an uber-expensive ‘AV’ switch). Instead, just connect the two devices together directly with a decent CAT6 cable. The Dante Controller software lets you set the IP address of the card, so there’s no need to configure a DHCP server.

Most set-up guides will warn you that you shouldn’t mix conventional network traffic with AOIP, and that some ethernet adapters are not compatible. They may, however, stop short of recommending what network adapter to use on your PC for a virtual soundcard.

We first tried a gigabit Intel Pro 1000 PT adapter (a PCI-E card with two gigabit ports), but we weren’t able to get it to perform properly for AOIP.

In the end, we used the motherboard’s built-in Intel I219-LM adapter for AOIP, and a 4-port HP NC364T for general network-y stuff. We found the HP PCI-e card worked reasonably ok for Dante, but the connection was more jittery (with latency jumping from 1ms to 5ms quite often) which didn’t sit right.

Intel I210-based network cards (such as the Intel I210-T1, which is – at the time of writing – is under £40 on eBay) seem ideal for Dante. It’s worth checking what the model your built-in ethernet adapter uses – if it starts with i21, you can use that for AOIP – and a cheaper PCI-E card for general network access.

Clocks + Sync

In a Dante network, one device will become the clock ‘leader’. This means that all other devices in the network will sync to it, which stops separate channels of audio drifting out of sync (remember, in AOIP land, there are no stereo pairs unlike AES/EBU). If you open the Dante Controller software, you can explore clock status and see which device is the current leader.

The main symptom of a clock problem is intermittent audio. If you’ve set up your AOIP network, and audio either works just in one direction, or cuts out for a few seconds every so often, it’s probably the clock. In our case, audio was flowing into the desk from Myriad Playout, but we couldn’t record/stream what the desk was returning.

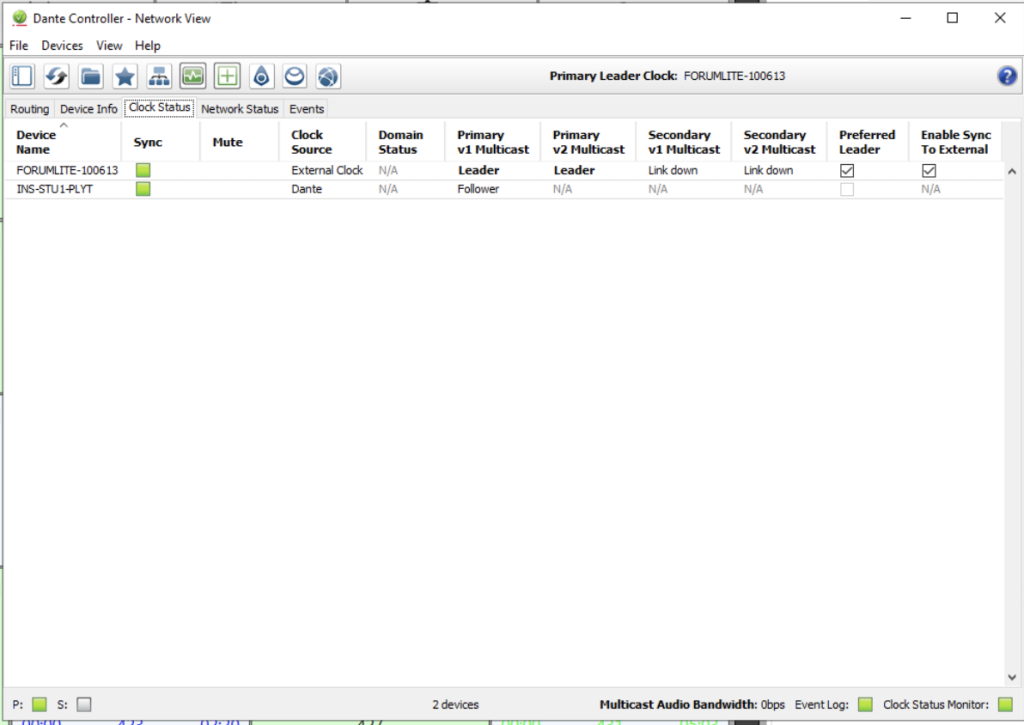
This didn’t look good…

If your clock leader is the mixer core (in small setups, it probably is), then it is very likely that the Dante card needs to use the mixer’s internal clock, rather than the built-in one from the Dante card. This is because the digital signal processing core in most modern mixers will have its own clock.

In Dante Controller, make sure the “Enable Sync to External” option is ticked (rebooting the device as necessary). If this option isn’t ticked, the Dante card will run with a different clock to the mixer, causing weird symptoms, such as that of the first screenshot.

(A big shout-out to my colleagues Mark and Lee at Broadcast Radio for helping me troubleshoot this)

Reducing Latency

Everything was set up and on air, but we had a problem: sometimes (every 20 minutes to 2 hours), latency would spike above 10ms, which results in a brief but noticeable interruption to audio. Not good.

The official troubleshooting guide says to ensure that all power-saving modes are turned off on the network card. Looking in the Device Manager in Windows, indeed, they were.

Or, so we thought.

Without several confusingly-described utilities installed from Intel, it turns out the Energy Efficient Ethernet settings can’t be changed in Windows. After installing the Intel PROSet Adapter Configuration software, we had access to a couple of new settings.

In the end, we found the following settings to be optimum (changes from the default settings are bold; settings you might not see – without all the PROSet utilities – are in italics):

Adaptive Inter-Frame SpacingEnabled
Energy Efficient EthernetDisabled
Flow ControlRX & TX Enabled
Gigabit Leader/Follower ModeAuto-Detect
Interrupt ModerationDisabled
Interrupt Moderation RateOff
Log Link State EventDisabled
Protocol ARP OffloadDisabled
Protocol NS OffloadDisabled
Receive Buffers256
Reduce link speed during system idleDisabled
Speed & Duplex1.0 Gbps Full Duplex
Transmit Buffers2048
Wake On Lan (any related setting)Disabled
No more late packets!

A week later and still no late packets.

Uncategorized

LetsEncrypt and Cloudflare: Generating Wildcard SSL Certificates Securely

Posted by Jamie Woods on

If you’re looking for a simple command to do this, look no further, there’s a tl;dr below!

If you use Cloudflare to run your website, chances are you use them to handle your website’s DNS records too. Which is great. However, say you want to add SSL support to your website without using the one built into Cloudflare (it doesn’t always work best for us).

This is do-able. LetsEncrypt has been around for a while, and recently it began to support wildcard SSL – essentially a way of saying you own the whole of *.insanityradio.com instead of just insanityradio.com and www.insanityradio.com.

Great! To generate a wildcard certificate, you have to prove that you own your domain, and the only completely fair way to do this is by using DNS records, as these are the glue that make up your website. But there’s a caveat, and what most online tutorials will tell you to do opens up a HUGE security vulnerability. Not kidding.

Before we delve deeper into a solution, let’s have a quick recap so we understand exactly what we’re trying to achieve.

How does LetsEncrypt work?

LetsEncrypt will give you a SSL certificate if you can prove that you have enough access to a fully-qualified-domain-name. Often, proving you control the content on the website is enough. But to get a wildcard certificate and prove you own the whole domain, you need to prove you can control the website’s DNS records.

How does it prove you have enough access to the domain? It uses a mechanism called challenge and response. We can nicely sum it up in 5 simple steps.

  1. We ask LetsEncrypt to validate that we own x.insanityradio.com.
  2. LetsEncrypt sends us a challenge text for this domain – think of it like a 2-factor authentication token – it changes every time.
  3. We put this challenge text up on the website, and tell LetsEncrypt to go and check it.
  4. LetsEncrypt tells us that they’ve been able to verify it.
  5. We ask LetsEncrypt to generate a SSL certificate for the domain(s) we’ve just validated.

Traditionally, LetsEncrypt would just prove we control the content on the website. If you remember having to upload those google_xaohdksjahdsakjdhas.html files to prove to Google Analytics that you own the site, it’s similar, but just highly automated.

Let’s go a step further. If we want to prove we own [everything].insanityradio.com, for this to work we’d have to scan every possible domain for this code. Because verifying one doesn’t imply we own all of insanityradio.com (think – if we owned myblog.wordpress.com and tried to verify wordpress.com, that wouldn’t make sense). However, as there’s infinite potential for domains, this obviously isn’t possible – we can’t do those 5 steps infinite times.

The best solution? Prove we own insanityradio.com‘s DNS, and hence physically control all of these sites underneath it.

This works exactly the same as above, but instead of shoving a file on the web server, we have to change its DNS records.

Enter Cloudflare – our DNS provider.

Cloudflare DNS

For this to work best, we need to automate changing these records. Unless you want to, every 60 days, do this whole process by hand. The answer seems immediately obvious, and is well documented everywhere:

Just feed your Cloudflare API key and email into the LetsEncrypt automation script, and let it handle everything.

But hang on – there’s a security hole!

Say someone hacks your web server somehow. Traditionally, this is probably not the end of the world.

But hang on, we’ve saved our Cloudflare API key on the server. When the attacker steals this, it’s game over. They have full control over our Cloudflare account, and the worst bit is Cloudflare won’t email us to tell us someone’s using our key.

Use your imagination to guess what an attacker could do with this access. They could:

  • Redirect your email traffic and intercept it, reset your passwords, and permanently steal your domain.
  • Add malicious code to your website without tampering with the web server
  • Disable your Web Application Firewall
  • Rack up a huge bill by using billable Cloudflare features

Big yikes.

What do now?

Cloudflare doesn’t let you generate a specific key for this, you have to feed the script your entire account’s.

However, there’s a better solution. It’s not perfect, but it completely mitigates the risk of the above.

Say we have a second domain we don’t care much about – insanityradio.co.uk. Nothing runs on it, but we keep it registered because #brand. If you don’t, you can simply register a new one – the name itself doesn’t matter, it could be anything. We’re going to set up this secondary domain so we can use it to verify we own insanityradio.coms DNS.

What?!? Yup. That’s a thing.

Let’s sign up for a new CloudFlare account (avoid using an email on the secondary domain), and set up our secondary domain with it. As we don’t use this domain for much, it’s less of a concern if an attacker gains access to it. They can’t really do much except generate SSL certificates for our main website – if they do, they don’t have the means to use them.

How does this work?

To validate DNS (step 3), we normally create a _acme-challege.insanityradio.com DNS record. This contains the challenge response from step 2.

Instead of creating a record with text, we can create an alias record (a DNS CNAME) that tells LetsEncrypt to look at another domain for this response.

For instance, to verify `insanityradio.com`, we can set up the following:

insanityradio.com CNAME _acme-challenge.insanityradio.com.insanityradio.co.uk

The domain name doesn’t need to be as huge as it is – in fact, we can set the record to any domain. However, if you’re verifying multiple sites in one go, you can’t reuse the target because DNS is slow. It’s best practice to use something unique per domain, and the best way to do that is just to use the domain itself.

The Take Aways

Some valuable lessons have been learnt.

  1. Avoid giving scripts full access to your domain’s DNS.
  2. Cloudflare’s API keys are extremely dangerous

tl;dr (aka the code)

  1. Sign up for a new Cloudflare account with a secondary domain and find its API keys
  2. Add _acme-challenge.insanityradio.com DNS CNAME records pointing to _acme-challenge.insanityradio.com.insanityradio.co.uk (that’s a big boy). If you want to verify a second level domain like *.cor.insanityradio.com, add a DNS record like _acme-challenge.cor.insanityradio.com DNS CNAME records pointing to _acme-challenge.cor.insanityradio.com.insanityradio.co.uk
  3. Install acme.sh$ curl https://get.acme.sh | sh
  4. Run the following to generate a certificate:
    export CF_Key="my cf api key"
    export CF_Email="[email protected]"
    acme.sh --issue \
    	-d insanityradio.com  --challenge-alias insanityradio.com.insanityradio.co.uk \
    	-d *.insanityradio.com --challenge-alias insanityradio.com.insanityradio.co.uk \
    	-d *.cor.insanityradio.com --challenge-alias cor.insanityradio.com.insanityradio.co.uk \
    	--dns dns_cf
    
  5. Add the following cronjob, to ensure your certificates are auto-renewed close to expiry. Make sure to replace `user` with whatever you want.
    0 0 * * * /home/user/.acme.sh/acme.sh --cron --home /home/user/.acme.sh > /dev/null
Uncategorized

Compiling nchan on Ubuntu 14.04

Posted by Jamie Woods on

If you’re using Ubuntu 14.04, and want to compile a version of the nginx nchan module that works with Redis, this is the guide for you. This is useful if you want to install security updates without recompiling nginx from scratch every time.

  1. Install the nginx PPA for your system: sudo add-apt-repository ppa:nginx/stable && sudo apt-get update
  2. Install nginx from the PPA: sudo apt-get install build-essential nginx-full libnginx-mod-nchan libpcre3-dev libxml2-dev libxslt-dev libgeoip-dev
  3. This’ll install an old version of nchan, but it will install most of the dependencies that we need.
  4. Test the new nginx version to make sure it works. As we’ve just installed a different version, we might have caused some compatibility issues compared to the standard one (i.e. what’s in the normal repositories)
  5. cd /tmp. Download and unpack the nginx we have installed
    wget http://nginx.org/download/nginx-$(nginx -v 2>&1 | cut -d "/" -f 2).zip && unzip nginx*
    wget https://github.com/slact/nchan/archive/v1.1.14.tar.gz && tar -xf v1.1.14.tar.gz
  6. Change directory to nginx. Run configure with the following:
    ./configure --add-dynamic-module=../nchan-1.1.14 --with-cc-opt='-g -O2 -fPIE -fstack-protector --param=ssp-buffer-size=4 -Wformat -Werror=format-security -fPIC -D_FORTIFY_SOURCE=2' --with-ld-opt='-Wl,-Bsymbolic-functions -fPIE -pie -Wl,-z,relro -Wl,-z,now -fPIC' --prefix=/usr/share/nginx --conf-path=/etc/nginx/nginx.conf --http-log-path=/var/log/nginx/access.log --error-log-path=/var/log/nginx/error.log --lock-path=/var/lock/nginx.lock --pid-path=/run/nginx.pid --modules-path=/usr/lib/nginx/modules --http-client-body-temp-path=/var/lib/nginx/body --http-fastcgi-temp-path=/var/lib/nginx/fastcgi --http-proxy-temp-path=/var/lib/nginx/proxy --http-scgi-temp-path=/var/lib/nginx/scgi --http-uwsgi-temp-path=/var/lib/nginx/uwsgi --with-debug --with-pcre-jit --with-http_ssl_module --with-http_stub_status_module --with-http_realip_module --with-http_auth_request_module --with-http_v2_module --with-http_dav_module --with-http_slice_module --with-threads --with-http_addition_module --with-http_geoip_module=dynamic --with-http_gunzip_module --with-http_gzip_static_module --with-http_image_filter_module=dynamic --with-http_sub_module --with-http_xslt_module=dynamic --with-stream=dynamic --with-stream_ssl_module --with-stream_ssl_preread_module --with-mail=dynamic --with-mail_ssl_module
  7. Run make modules
  8. Copy objs/ngx_nchan_module.so to /usr/lib/nginx/modules/ngx_nchan_module_new.so.
  9. Rename /etc/nginx/modules-enabled/50-mod-nchan.conf to 50-mod-nchan-new.conf, edit it, and change ngx_nchan_module.so to ngx_nchan_module_new.so.
  10. Run nginx -t to test that it installed OK.
  11. Restart nginx. Done!
Uncategorized

How-To: Super Scalable Streaming with HLS

Posted by Jamie Woods on

We’ve just launched AudioEngine, a free Docker-ecosystem based system for completely managing your stream deployment. This includes HLS and DASH, as we outlined in this tutorial. You can read up on it, and get the code, here.

This tutorial will run you through how to build a crazy scalable streaming platform for your radio station, using HLS. This is a long one, so grab a cup of coffee or a Coke.

First, you’ll need to sign up to Google’s Project Shield. This is totally free for independent (e.g. community) radio stations. You can do that here. If you want to use another provider, that’s fine also.

You also require a Linux (or other UNIX-y) server. Although nginx builds fine on Windows, we haven’t tested it.

Although this works on most platforms, there are some exceptions. Notably, in Internet Explorer on Windows 7 and below. For that, you can probably use Flash as a polyfill. We’re not using HE-AAC here, as it’s not supported in all major browsers. If you want to (you’ll break support for Flash/IE, Firefox, and probably Opera – far too many users) add “-profile aac_he_v2”.

Setting Up the Server

On your Linux server, make sure you have GCC installed.

On CentOS/Fedora/etc., run yum -y install gcc gcc-c++ make zlib-devel pcre-devel openssl-devel git autoconf automake cmake pkgconfig.

On a Debian machine, you can run apt-get -y install build-essential zlib1g-dev libpcre3 libpcre3-dev libbz2-dev libssl-dev tar unzip git autoconf automake cmake pkgconfig. If you’re using another flavour of Linux (or UNIX), find the packages above and install ’em.

Next, we need to get and compile nginx with the “nginx-ts-module”. You can also use nginx-rtmp-module, but there’s no point unless you want a full RTMP server.

Move to the tmp directory with cd /tmp

To do this, go to the nginx website and download the latest stable version. For instance, run wget http://nginx.org/download/nginx-1.12.1.tar.gz

Extract it. tar -xf nginx-1.12.1.tar.gz

Next, run git clone https://github.com/arut/nginx-ts-module.git to download nginx-ts-module

Now, cd nginx-1.12.1

Build nginx by running:

./configure \
--user=nginx                          \
--group=nginx                         \
--prefix=/etc/nginx                   \
--sbin-path=/usr/sbin/nginx           \
--conf-path=/etc/nginx/nginx.conf     \
--pid-path=/var/run/nginx.pid         \
--lock-path=/var/run/nginx.lock       \
--error-log-path=/var/log/nginx/error.log \
--http-log-path=/var/log/nginx/access.log \
--with-http_gzip_static_module        \
--with-http_stub_status_module        \
--with-http_ssl_module                \
--with-pcre                           \
--with-file-aio                       \
--with-http_realip_module             \
--without-http_scgi_module            \
--without-http_uwsgi_module           \
--without-http_fastcgi_module         \
--add-module=/tmp/nginx-ts-module

Then, make && make install

Now, to install it on boot, run these commands:

useradd -r nginx

wget -O /etc/init.d/nginx https://gist.github.com/sairam/5892520/raw/b8195a71e944d46271c8a49f2717f70bcd04bf1a/etc-init.d-nginx

The on-boot commands may differ based on your operating system. Google for “build nginx ” and see what it advises there.

Excellent. We’ve built it!

Configuring nginx

In /etc/nginx/nginx.conf, add the following server block:

server {
	listen 80 default;
	root /srv/stream;
	client_max_body_size 0;
	location /stream {
		allow 127.0.0.1;
		deny all;
	
		ts;
		ts_hls path=/srv/stream/hls segment=10s segments=30;
		ts_dash path=/srv/stream/dash segment=10s segments=30;
	}

	location ~ \.(h|mpd|m3u8)$ {
		add_header 'Access-Control-Allow-Origin' '*';
		add_header 'Cache-Control' 'max-age=9';
	}

	location ~ \.(ts|mp4)$ {
		add_header 'Access-Control-Allow-Origin' '*';
		add_header 'Cache-Control' 'max-age=86400';
	}

}

Next, run mkdir /srv/stream /srv/stream/hls /srv/stream/dash /srv/stream/hls/stream /srv/stream/dash/stream to make our web folders for nginx to serve. Then, chown nginx: /srv/stream/dash

Now, we can start nginx with service nginx start and chkconfig nginx on.

Our HLS stream becomes available at http://host-name/hls/stream/index.m3u8, and DASH at http://host-name/dash/stream/index.mpd.

Adding the Plumbing

We have our origin server configured now. Next, we need to pipe some audio into it.

First, install ffmpeg. We need it with “libfdk-aac” so we can get a good quality stream. This will use the most modern HE-AACv2 codec, as it ensures the highest quality at the lowest bitrates. You can follow a guide here for CentOS on how to do so. For Ubuntu/Debian, make sure you have installed autoconf, automake, cmake, and pgkconfig (we did this above). You can then follow the CentOS guide, which should be mostly the same.

In /usr/local/run.sh, add the following (replacing the stream.cor bit with your regular stream URL):

#!/bin/bash
while [ true ]; do
    ffmpeg -i https://stream.cor.insanityradio.com/path_to_icecast_mp3 -c:a libfdk_aac -b:a 128k -f mpegts http://127.0.0.1/stream
    sleep 0.1
done

These commands tell ffmpeg to grab a copy of your Icecast stream, encode it with High Efficiency AAC, and send it to the server so that it can repackage it for browsers. If it crashes, it will automatically restart after 1/10th of a second (this is intentional, as if the system is ill-configured, the batch job would choke available system resources).

If you want to get even better quality, you can use an RTP stream or something else in the ffmpeg command. The reason I’m not using this in the example above is that, to achieve that, it requires an overhaul of your streaming architecture to use PCM on ingest. If you have a Barix based STL, you can configure it to RTP send to your streaming server, thus saving the need for an extra audio interface.

Append to /etc/rc.local the following line to instruct the system to automatically restart our script on boot:

/usr/local/run.sh&

(You could do this using systemd or initv for production, but this works well enough)

Excellent. When you run /usr/local/run.sh& or reboot, you should be able to access your streams.

Setting up the CDN

CDNs are designed to copy your content so that it can scale. For instance, instead of having one server (our origin) serving 100,000 clients, we can send this to lots of “edge” servers. Providers make this easy and are more cost efficient.

We’re using Project Shield, because it’s totally free for indie media, and harnesses the same power of Google. Other freebies exist like CloudFlare, but CloudFlare’s terms of service don’t let you use it for multimedia.

The nginx config we used above should allow your CDN to work properly from the onset. It will cache the manifest/index files (that instruct the client which audio segments to get) for 10 seconds. After 10 seconds, the files will have changed so we want the edges to update. The media files will be cached for a day so once the CDN grabs it once, it will never need to again.

Usage & Testing

I’ll post some sample player code on GitHub, but you probably want to use the HLS stream with hls.js. You can test it on this page. Why not DASH? nginx-ts-module, at the time of writing, has tiny gaps between audio segments. These are pretty audible to an average listeners, so until that is fixed we might as well continue using HLS.

Once again, the streaming URLs will be http://yourcdnhost.com/hls/stream/index.m3u8 (HLS), and http://yourcdnhost.com/dash/stream/index.mpd (DASH).

Do consider setting up SSL. It requires a couple of tweaks in your nginx configuration, and LetsEncrypt makes it much easier. Google are working on support for LetsEncrypt in Shield – hopefully when you read this it will be much easier to use, instead of having to manually replace SSL/TLS certificates every 60 days.

Going Further

The nginx-rtmp-module, similar to install, provides adaptive bitrate HLS (but not DASH). However, there is a bug in Mobile Safari that adds silent gaps between the segments. The TS module will soon support now supports adaptive HLS, this guide will be updated when that happens. You can also hack it yourself.

Uncategorized

Email: Vulnerable To Blacklist

Posted by Jamie Woods on

This morning I received an email informing me that the Insanity Radio mail server had been added to two email blacklists.

*Groan* go most system administrators. This usually means one of our users’ has had their email account compromised, probably by using a weak password. Most of the time, this is probably right. However, the reasons behind this were more alarming than you’d consider, and actually point to a vulnerability within most Postfix/SpamAssassin set-ups.

A bit of background: Postfix is a mail server. SpamAssassin is a server which is fed emails and responds with a score on how spammy the email is. Combine the two and you have a pretty good way to filter out spam. However, this is where it gets a bit more tricky.

Postfix has a concept of filters – a way of running email through a bit of code. There are two main types, before-queue and after-queue. before-queue will apply the filter before the email is accepted by the server, and after-queue will apply after the email is accepted.

The problem is that most SpamAssassin set-ups work after-queue. This means that your incoming mail server will accept spam emails before it scans them. If it rejects an email later on, it will send a response to the sender saying it bounced, and why.

You’ve probably seen emails from “MAILER DAEMON” saying stuff like “The email you tried to send your thing to doesn’t exist”. It’s pretty much the same.

Now, there’s actually a surprisingly easy way to exploit this. This could be used by an attacker to quite comfortably destroy the reputation of a mail server. Scary, huh? The attack can be done in a few simple steps.

  1. Connect to your target mail server.
  2. Send the most horrible spammy email you can, one that checks all the boxes on SpamAssassin
  3. Set the envelope address to a honeypot address
  4. Rinse & Repeat

The mail server will send a bounce email to the honeypot address, and will get added to an email blacklist as a result.

The best solution is just to install amavisd, and just let that handle interconnecting to SpamAssassin.

Uncategorized

Welcome

Posted by Jamie Woods on

This blog details the technical changes that occur under-the-hood at Insanity Radio 103.2FM, a community radio station who live in Surrey.

Why? Our technical operations are very fast paced, and we do a lot of things that aren’t industry standard. But we want them to be.

Feel free to pinch any of the ideas on this site for your own use, commercial or otherwise. Also to criticise, etc. We’d honestly love to hear feedback.